
Loading Cellebrite Images into Magnet AXIOM
Cellebrite images are quite popular, as the tool supports many different devices and extraction types. Because of this, you may get several different image types depending on the device and the type of extraction done. Often, I will get questions on how to load Cellebrite images into Magnet AXIOM and while it’s quite easy, it’s not always straightforward.
Luckily, Cellebrite doesn’t do anything proprietary to their image formats which is helpful for examiners wishing to use multiple tools to analyze or validate their findings. This is not meant to be a complete guide to using Cellebrite UFED or Physical Analyzer but simply as information to help examiners get the most out of the data they are able to extract.
UFD/UFDX files
Most Cellebrite users are used to seeing the .UFD or .UFDX files that are created by Cellebrite. Typically, an examiner will use these to open the image in Physical Analyzer. However, these are configuration files that contain metadata about the image and the extraction performed by UFED, not the image itself.
UFDX files are used when the examiner extracts several different image types of the same phone. Each extraction will have a corresponding .UFD file while the .UFDX file contains metadata about all the extractions which allow the examiner to load them all into PA at once.
These files do not contain the image but they may contain valuable information such as extraction details and passwords if one was used to create the image. They can be opened with most text editors like Notepad. The actual image files will be located nearby in various formats depending on the type of extraction and device. AXIOM has the ability to ingest and read .UFD files directly, but there may be situations where it doesn’t recognize the way the .UFD file structures the images, so they may need to be manually loaded.
CLBX files
For full file system extractions, Cellebrite may package the data in the CLBX file format – a ZIP archive. The data contained in CLBX files can be parsed by Magnet AXIOM and AXIOM Cyber. For examiners, this makes the process of validating our findings easier.
Another component of CLBX acquisitions is the inclusion of keychain data from iOS devices. Magnet AXIOM and AXIOM Cyber can automatically parse the keys contained in the CLBX-formatted keychain data for display in AXIOM Examine. In addition, AXIOM can extract valuable key information and apply it to artifacts automatically for decryption.
Keychain data is potentially a rich source of information examiners can use for access to other data relevant to an investigation. With iOS devices, it is likely that an iCloud account is associated with the device, which might contain photos, messaging data, files, device backups, and other items depending on how a user had their device configured. The keychain data may also include usernames and passwords for other connected services including social media, cloud storage, email, and a variety of other third-party applications.
With mobile devices, the number of connected services with cloud-stored data is seemingly endless. Knowing which services are in use on a particular device and having a means to access that data could be a huge benefit in mobile device examinations. The parsing and automatic decryption of keychain protected data and the investigative leads provided by the Cloud Insights Dashboard in AXIOM Examine provide examiners with actionable intelligence in their cases.
Logical, File System, and Physical Images
Cellebrite uses these terms to determine the type of data that is returned to the examiner. Each tool may use slightly different terms, but these pretty accurately describe the type of data being returned.
Physical extractions are usually ideal when available and include the most data as it is stored on the physical chip.
File system extractions may include a full or partial file system extraction and while it’s not as complete as a physical image, it will contain a good amount of data that can be analyzed.
Sometimes you may be limited to just either an iTunes or ADB backup depending on the device, these backups are still logical images but you are at the mercy of the OS or application whether that app’s data gets backed up or not. These extractions are still better than the logical extraction below because it will still include an image that can be loaded into other tools.
Logical extractions often have the least amount of information and while they can be useful, they don’t often have an actual image associated to them, they are simply a report of what can be pulled from a device. Loading these extractions into another forensics tool will have minimal value as you’re basically loading an CSV/spreadsheet of what Cellebrite found, for that reason, I wouldn’t recommend loading these into any other tool other than PA.
Loading Images into AXIOM
AXIOM gives you several ways to load evidence into it but the most common is definitely loading evidence as an “Image”. From the Evidence Sources window,
- Choose “Mobile”,
- Then either “iOS” or “Android” (depending on the type of device being examined),
- “Load Evidence”,
- Then select “Image”
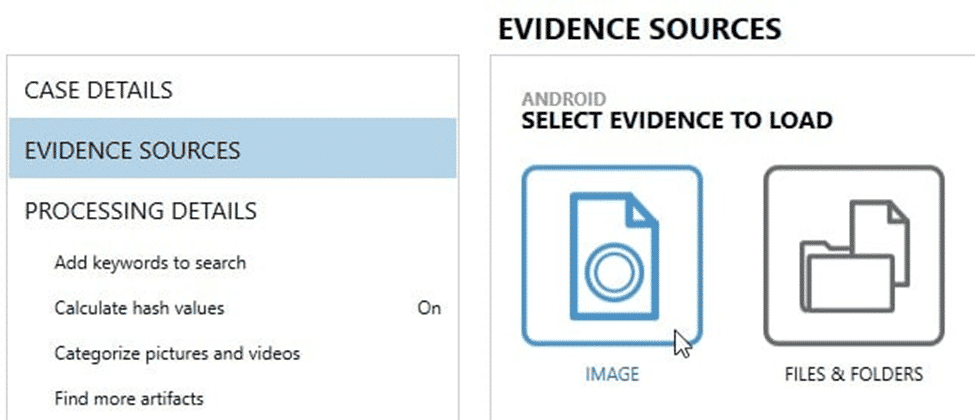
This will let you load the images created by various tools, including Cellebrite. Files & Folders is a good option if the file format is not supported but AXIOM typically supports most file extensions you will see for the different image types. Even compressed containers such as zip and tar are supported as an image type.
Let’s take a look at some common formats created by Cellebrite:
Android – Physical
For physical Android images, you’ll typically see BIN files that represent the image that Cellebrite created. These BIN files can either be segmented or a separate BIN file representing each partition recovered.
You can typically tell the difference between a segmented BIN vs. a non-segmented BIN based on the filename. Segmented BINs will all have the same start of the filename but include either brackets enumerating them (mmcblk0, mmcblk0(2), mmcblk0(3), etc.), or underscores (sda1_1, sda1_2, sda1_3, etc.). Non-segmented BINs will have separate filenames altogether representing the partition (sda1, sda2, sda3, sda4, etc. or system, user, boot, recovery, etc.). The screenshots below show examples of segmented, non-segmented, and hybrid images that have both segmented and non-segmented BIN files:
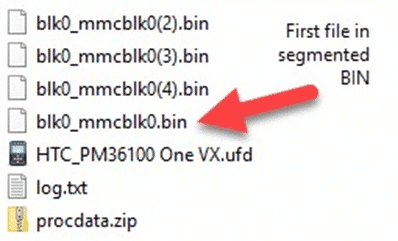
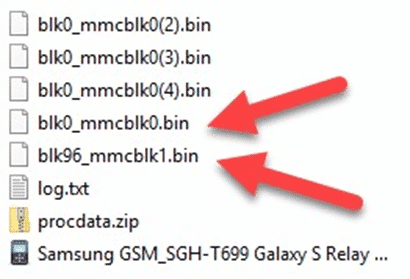
To load a segmented BIN file, simply load the first one in the series into AXIOM or IEF as an “Image” and it will find the rest automatically and load them. This works similar to how you would load in a segmented E01 file (E01, E02, etc…) or ZIP (Z01, Z02, etc…).
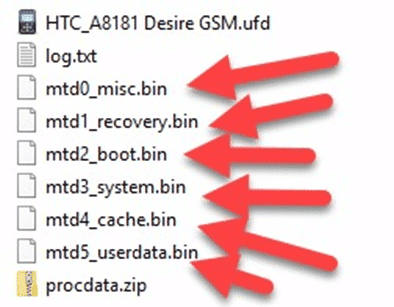
As mentioned above, you may see BIN files named by their partition such as SDA1, SDA2, SDA3, etc. Treat these as non-segmented files as they each represent a different partition. The segmented ones would be named SDA1_1, SDA1_2, SDA1_3, etc. separated by the underscore. To load in the non-segmented files, make sure you load each one as separate evidence items. Most tools won’t automatically find all of them as they are considered separate images of each partition. The filename will help you understand whether it’s segmented or not, if you’re still unsure, look inside the .UFD which should give you some additional help.
Android – File System
Cellebrite will potentially create many different file types depending on the file system extraction type chosen and the model of device being examined (ADB, ADB Backup, Advanced ADB, etc.). Often you will get segmented ZIPs such as the ones below:
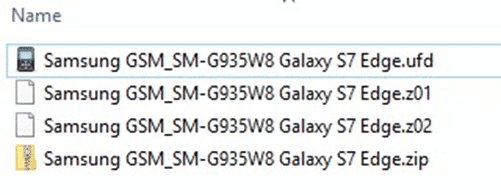
As mentioned above, load the segmented ZIPs as Android Images in AXIOM just like the segmented BIN files (load the first ZIP and AXIOM will automatically load the other Z01/Z02/etc.).
Once loaded, AXIOM should handle the rest and you can set your processing options and artifacts just like any other image type.
iOS
iOS physical extractions are only available for the iPhone 4 or older devices as that is when Apple began encrypting data and preventing access to the physical device. Most current devices are limited to either a file system extraction or iTunes backup.
iOS images are created through Cellebrite PA and examiners are usually given the option of a method 1, 2, or 3 extraction depending on the device and what is available:
- Method 1 – iTunes backup using the Apple File Connection (AFC).
- Method 2 – Also an iTunes backup but may get additional data by creating an encrypted backup.
- Method 3 – Method 3 extractions are only available if the iOS device is already jailbroken, it will give you a full file system dump of the phone. This is ideal but not always available as it’s rare to have a user’s iOS device already jailbroken.
The most common image formats for iOS are .IMG, .TAR, or segmented ZIPs like the Android examples above. These can all be loaded into AXIOM under iOS Images as the file types are supported as images in AXIOM.
iOS Backup Encryption
One thing to note, if you load an encrypted backup into AXIOM, make sure you load it as an “Image”, not under Files & Folders. If loaded under Files & Folders, AXIOM won’t know to treat it like a backup and won’t prompt you for the backup password. If loaded correctly under “Images”, it will recognize that the backup is encrypted and ask you for the backup password.
Cellebrite may apply its own backup password if one isn’t set on the device already which enables you to get more data included in the backup (including the keychain). This information is stored in the .UFD file and can be read with Notepad. If the device owner set one previously, you’ll need to know the backup password or crack it with another tool such as Passware, Elcomsoft, or Hashcat in order to continue with the decryption.
As stated at the beginning, there are several methods and types of extractions that can be done; this document is meant to help examiners understand the files they are getting returned so they can be used to their fullest extent and loaded into other tools for additional analysis or verification. For more details on how to load other images into AXIOM, see the other blogs in the series: GrayKey, XRY, and Oxygen.