

Custom Fields: New Feature in DVR Examiner
We’re happy to announce the release of a new feature in DVR Examiner: Custom Fields.
With the release of DVR Examiner 3.1, we included three new report types, improved report layouts, and added a new “Generate Reports” section where you can create all the reports you need at one time, in one place. To learn more about these reporting features in DVR Examiner, check out the blog by Garry Dukes.
With DVR Examiner 3.1.2., we have released a new “Custom Fields” feature to compliment these reporting capabilities. This feature allows you to create your own data entry field within the “Area” of the case where you need to capture additional information. Entries to those fields are then included in the associated reports generated for that case.
How Custom Fields Can Help
Custom fields are especially helpful when you need to add additional information as part of your agency’s standard operating procedure, but there isn’t a standard field in DVR Examiner to capture that information.
For example, if you need to include the penal code violation that’s being investigated with your report, or you need to document the date and time you completed a specific process or step, you need or a checkbox to indicate whether a process or step has been completed. Your agency can now add a custom field to DVR Examiner, which will be included in your report.
How to Add Custom Fields
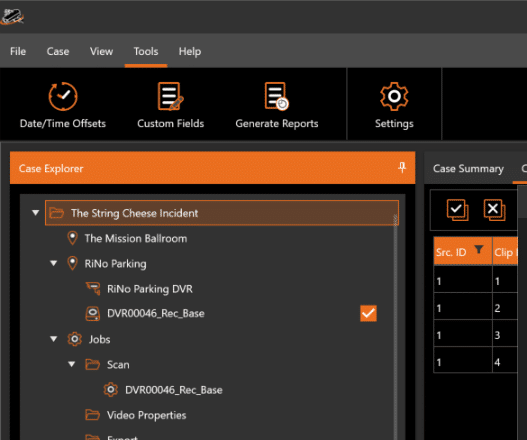
To add a custom field, go to Tools and click the “Custom Fields” option in the main menu. (Figure 1)
This opens the Manage Custom Fields window where you can add, edit, or remove custom fields based on your workflow or your department workflow. (Figure 2)

To add a field, you first select the Area of the case in which you would like to have the custom field appear (e.g., Case, Location, Device, or Source). In this example, we will select Case. Next, click the “+” in the toolbar to add the field to your list. Once the new field is added, you can name your field. Select the row of the field you just added. The row will be highlighted indicating that it has been selected. Then double click on the “name” column in that row and a text entry box will become active allowing you to enter the name that you want for the field. Once you have entered the name, you can assign the field type.
In the example below (see figure 3), for item 1, we have selected “Text” as the data type, which will allow you to enter any type of text for the custom field.
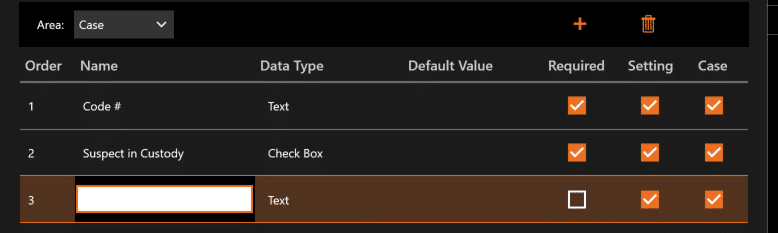
For item 2, which we have named “Suspect in Custody”, we have selected “Check Box” as the data type, allowing you to create, for example, a check box to note if a suspect is in custody or leave the field unchecked if there is not a suspect in custody (see figure 4).
In addition to Text and Check Box, you can select Number, Date/Time, and List as data types. If you would like to have the field appear with a default, you can double click the Default Value column for the field you want the default to appear in and enter the default. Lastly, you can make the custom fields “Required” and as an additional Setting, you can make the custom field always appear in the application or whether you want the field to only appear in you current Case. (Figure 3)
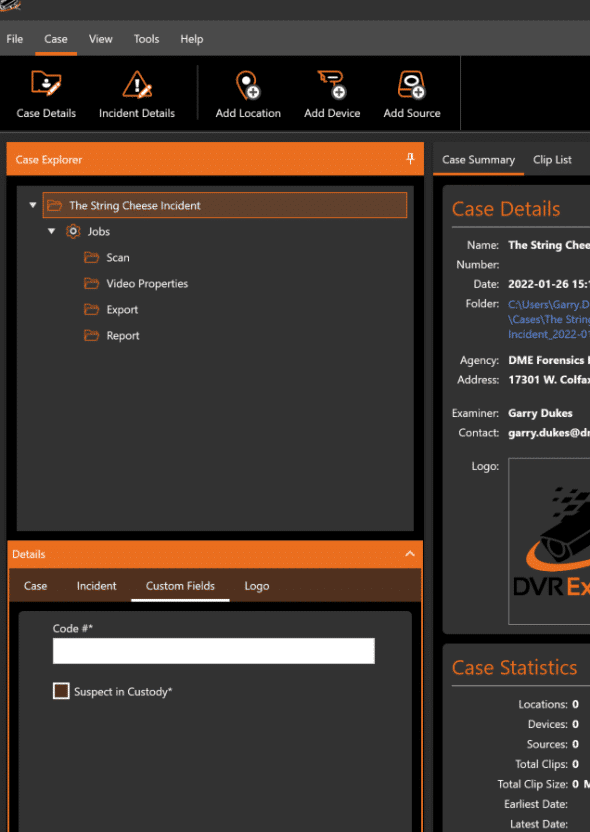
Once you have configured the custom fields, click “Save” and they appear in the Case Explorer pane under the assigned area. In this example, we added two custom fields under Case. To view them, click on the case name and in “Details”, located below the Case Explorer, you will see a Custom Fields option has been added. Select that, and you will see the fields that have been added to the case. Enter the appropriate values in these fields and those values are added to the DVR Examiner case. They will also be included in the associated reports generated for this case. (Figure 4)
Learn More in Our Tips & Tricks Webinar
To learn more about how to use the new custom fields feature and the new features, including custom layouts, introduced in the latest 3.1.2 release, check out our Tips & Tricks Webinar, where we will demonstrate all the new features and in greater detail.