
AXIOM at Work: Building a Gold Build Hash-Set for Use in Magnet AXIOM
Throughout the years, the amount of data investigators are required to examine has dramatically increased, with the rise of cheaper storage, more devices operated by individuals, and high demands on quick actionable intelligence by leadership. As these demands continue to rise, we as investigators need to find solutions to help filter out the noise in our investigations, providing us with the evidence we need to complete or case work.
While this guide isn’t necessarily restricted to only those working in corporate or consultant-based roles, the use of release builds or “Gold Builds” is something many organizations are accustomed to using as a part of their endpoint deployment process. Utilizing a standard image of an organization’s release build we can easily build custom hash sets for use in removing the files we see on a constant basis while completing our casework. In this blog post and video we’ll walk through creating a gold build hash set, subsequently then adding into AXIOM.
Before Getting Started You’ll Need:
- Software such as FTK Imager, Arsenal Image Mounter, Acronis True Image or Microsoft’s built in utility for mounting ISO images
- Image file of your organization’s current end-point build
Depending on how your IT department deploys their standard images (they may have a few based on the organization’s size and different types of roles within the organization), you may need to adjust your method on how to obtain the hashes, but often IT will use ISO images to store and deploy the gold image across the enterprise. If they use something different, you may need to research a method to mount the data if the above options are not supported. Luckily ISO is a pretty common format used and should work in most scenarios. Worst case, if you don’t have a tool to mount the image format used by your IT department, taking a cleanly deployed computer and using that can also work as a good alternative.
Creating a Hash Set From an .iso Given to Technical Investigations Teams by IT
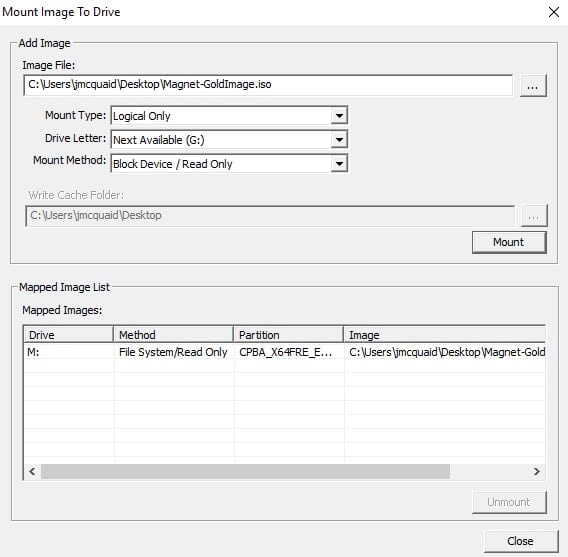
In my example, I have two gold images to work with, one is an ISO image and the other an Acronis TIB file. The ISO was easily mounted in FTK Imager but the TIB file required me to install Acronis True Image in order to mount it. My screenshot below uses FTK Imager to mount the ISO as read-only.
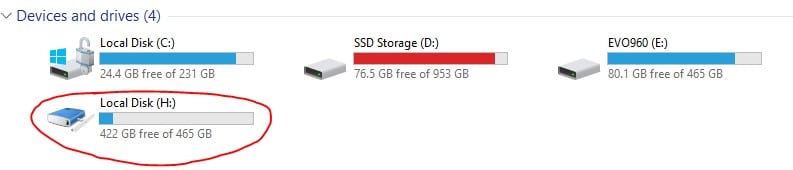
To mount the TIB file, I installed Acronis True Image (there’s a free trial for it but if your IT department is using it to create their images, then they probably have licenses for it as well). Once installed, you can just right click on the TIB file and there’s a menu button for Acronis and an option to mount the volume. The screenshot below shows the image mounted to my H: volume.
Once mounted, the image should appear as a local drive in Windows Explorer and you can query the files to obtain hash list of all the whitelisted files you will need for AXIOM. You could use most forensic tools to do this, or a quicker method would be to just use PowerShell to hash the files for you. Open up PowerShell and run the command below:
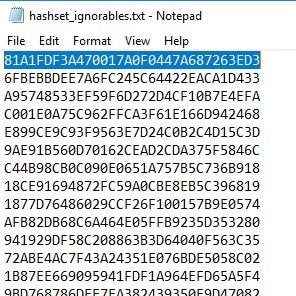
- dir H:\ -Recurse | Get-FileHash -Algorithm MD5 | foreach { $_.Hash } | select -unique > hashset_ignorables.txt
- Where “H:\” is the drive letter of the mounted drive, and “hashset_ignorables.txt” is the file that will contain the MD5 hashes.
This will query the mounted volume (H) and create an MD5 hash for every file from the image and write all the unique hashes (remove duplicates) to a text file called hashset_ignorables.txt.
Loading Hash Sets Into AXIOM
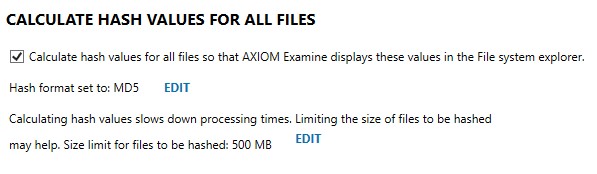
Now that we have our hash set, the last step is to load it into AXIOM. Now there are a few different hashing options in AXIOM Process. First, you’ll want to enable the hashing of all the files under the “Calculate Hash Values” in Processing Options and choose the appropriate hash algorithm that you used (MD5 in our case).
AXIOM Process gives you two places to load hash lists under “Calculate Hash Values”: Tag Files with Matching Hash Values and Ignore Non-Relevant Files. For our case we want to whitelist the files that are non-relevant to our case and thus any matches from the gold image would have no impact to our investigation because we know it came from a known good, clean image.
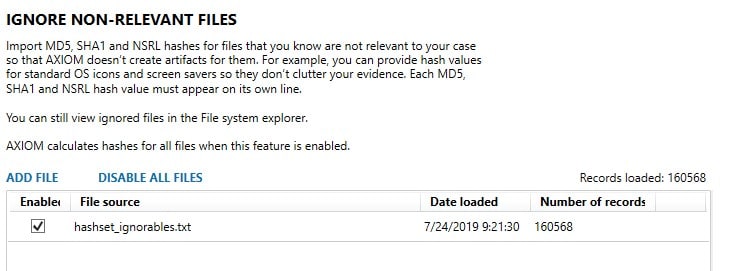
Once loaded, we can set any other options and artifacts we wish to use for searching our evidence and begin processing. The hash list will remain persistent in AXIOM Process between cases so all future cases will have this hash set available to be used and can be enabled or disabled via the checkbox on the left. When the processing completes, we’ll have a completed case with all regular artifacts we expect except any files that would have matched our list of known good files. This method helps eliminate searching many of the icons or known system files that are installed by default with Windows or by your IT department.
Get Magnet AXIOM 3.5 Today! If you’re already using AXIOM, download AXIOM 3.5 over at the Customer Portal. If you want to see how AXIOM 3.5 can help you find the evidence that matters, request a free 30-day trial today!
More in this Series
- AXIOM at Work: Mac USB Investigations
- AXIOM at Work: Malware Investigations
- AXIOM at Work: Connections for Data Exfiltration Cases
- AXIOM at Work: Timeline Explorer for IP Theft
- AXIOM at Work: Magnet.AI in Insider Threat Investigations
- AXIOM at Work: Magnet.AI in Harassment Investigations
- AXIOM at Work: Building a Gold Build Hash Set for Use in Magnet AXIOM
- AXIOM at Work: Windows USB Investigations