

Persistence with the Magnet AXIOM Cyber Agent
AXIOM Cyber has quickly become an important asset in many forensicators’ toolbox, especially when covert remote collections are a necessary part of the workflow.
AXIOM Cyber can quickly deploy agents to both Windows and Mac endpoints and we also recently announced support for acquiring from the latest M1 based Macs.
In this article we’ll discuss how to make AXIOM Cyber’s remote acquisition agent persist even after an endpoint restart.
If you haven’t tried AXIOM Cyber yet, request a free trial here.
Setting Up Scheduled Tasks in AXIOM Cyber
Currently if an examiner deploys an AXIOM Cyber agent to an endpoint for a collection and that endpoint is then shutdown or rebooted, the Cyber agent will not persist or restart the queue for the data initially selected for acquisition. However, configuring a scheduled task can help mitigate this limitation. Setting up a scheduled task for the Cyber agent will help resume collections after a user logs off or restarts their system. The Magnet team is researching avenues for natively allowing our agent to be persistent, so it can reconnect after a reboot for future releases of AXIOM Cyber, but for now let’s review setting up scheduled tasks.
There are a couple of triggers that were tested for this solution. One was using an “At Log on” trigger and the other was using an “At start up” trigger. Each has their pros and cons to consider. An “At log on” trigger can be set to execute whenever a specific, or any, user logs on to the system. But the task will not execute until someone actually logs on. So, if a user restarts the system but does not immediately log on, the task will not run until they do.
An “At start up” trigger will execute once the system is restarted and is back up, prior to any user logging on to the system. However, this doesn’t seem to work when a user simply logs off of the system. The task will not be executed when the user logs back on. The “At Start up” option will only work after the system is rebooted, then the task will get executed. Depending on your use case, one may be preferable to the other.
The steps to set up the tasks via the GUI are noted in this document. However, these tasks may be deployed via GPO or even remotely, but this will walk through what options need to be configured for this to work as tested.
As a note, you’ll need to have admin privileges to create these tasks.
Step 1
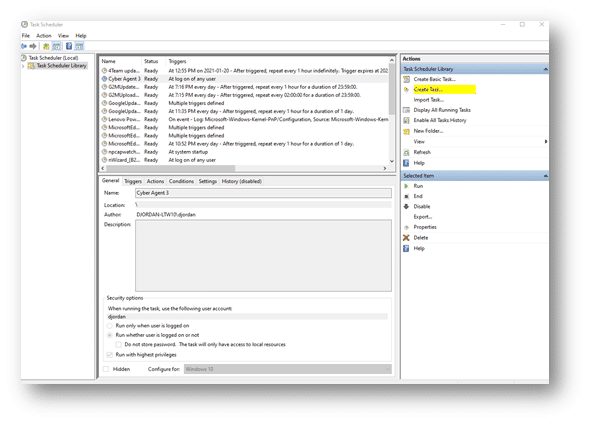
Open the Task Scheduler and select “Create Task…“
Step 2
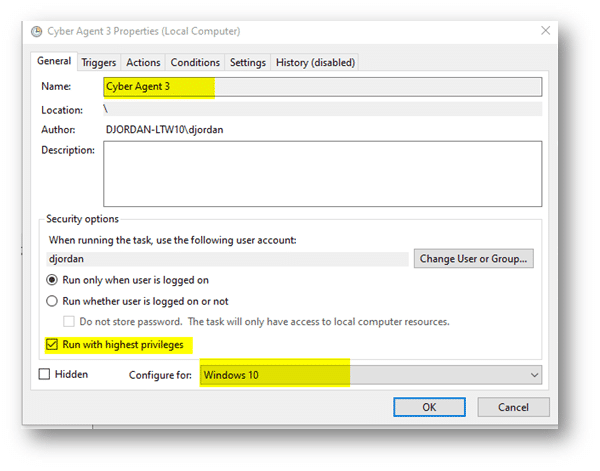
Now we will define the parameters of our task. On the General tab is where we will give the task a name, tell it to run with highest privileges and set the OS version it should be configured for as highlighted below.
Step 3
Next, on the triggers tab, we will define the triggers that will cause the task to execute on the system. On the Triggers tab, select “New…” to create a new trigger. The first item to configure is the “Begin the Task” dropdown menu. This is where we can choose the “At log on” or “At start up” triggers, among the others. We will configure this one with an “At log on” trigger to illustrate. Also, your other options on this tab will be different depending on the trigger you choose. The next option we’ll set is to have the task execute when a specific user logs on or just when any user logs on. Again, this could depend on your use case. Then we want to make sure the “Activate” box is checked with the date you want to start the task. And finally make sure the “Enabled” box is checked so the task will be enabled and ready to run.

Step 4
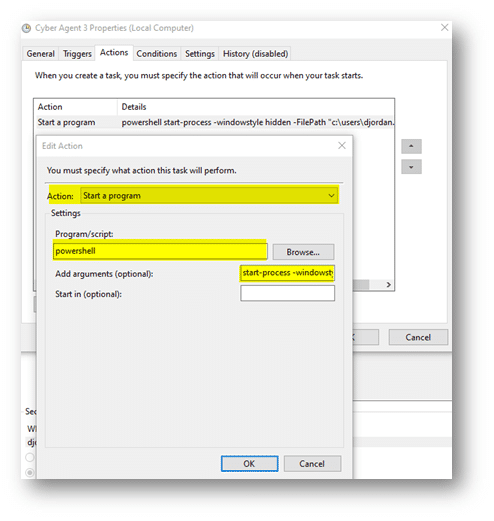
Next navigate on to the Actions tab, which is where we will configure what will happen when the task executes. This is where we will actually launch the agent when the user logs on. On the Actions tab, select “New…” to add a new action. For the Action, we will want to select “Start a program” from the dropdown box. In order to execute the agent without a command prompt showing for the user, we need to execute the agent via powershell. For the program/script we will put in powershell and a couple of command line parameters in the “Add arguments” box. The arguments to add here are: start-process -windowstyle hidden -FilePath “c:\path\to\agent.exe”. In testing this will launch the agent as a background process without showing a command prompt window.
Those are the main options you’ll need to set so the scheduled task will run upon any user logon. There are some other options on the Conditions and Settings tabs that you may want to set depending on your environment as well but those were not really tested here.
One note on how this would work from a collection perspective. If you are in the middle of collecting a very large file when the user reboots/logs off, the collection of that particular file will start over once the agent is back online. If you are downloading several files/folders, when the user reboots/logs off, AXIOM Cyber will retain the queued items and continue downloading once the agent is back online. Lastly, make sure to remove the scheduled tasks that you’ve created after the collection. This will prevent malicious execution of an executable file that is created with the same name of the agent in the future.