

Finding the Best Data Recovery Workflow in DVR Examiner 3
Data recovery is a key function of DVR Examiner for all our users, despite varying case load and case nature. An efficient workflow, and the ability for users to customize the workflow they follow based on their particular case needs, ensures rapid time to evidence, and is a major focus as we release new versions of DVR Examiner.
In this blog, we’ll be highlighting the major changes made between DVR Examiner 2.X and DVR Examiner 3 which ultimately provide our users with a greater degree of customization and workflow control.
Before the release of DVR Examiner 3, the software essential offered a single workflow from detection to export, as you can see in Figure 1 below. This workflow worked well enough for single source cases, however in instances where a user might be working with a DVR that contains multiple hard drives, or a case where multiple DVRs are in play, a new case would have to be created for each source, with the same workflow being followed each time a new source was scanned.
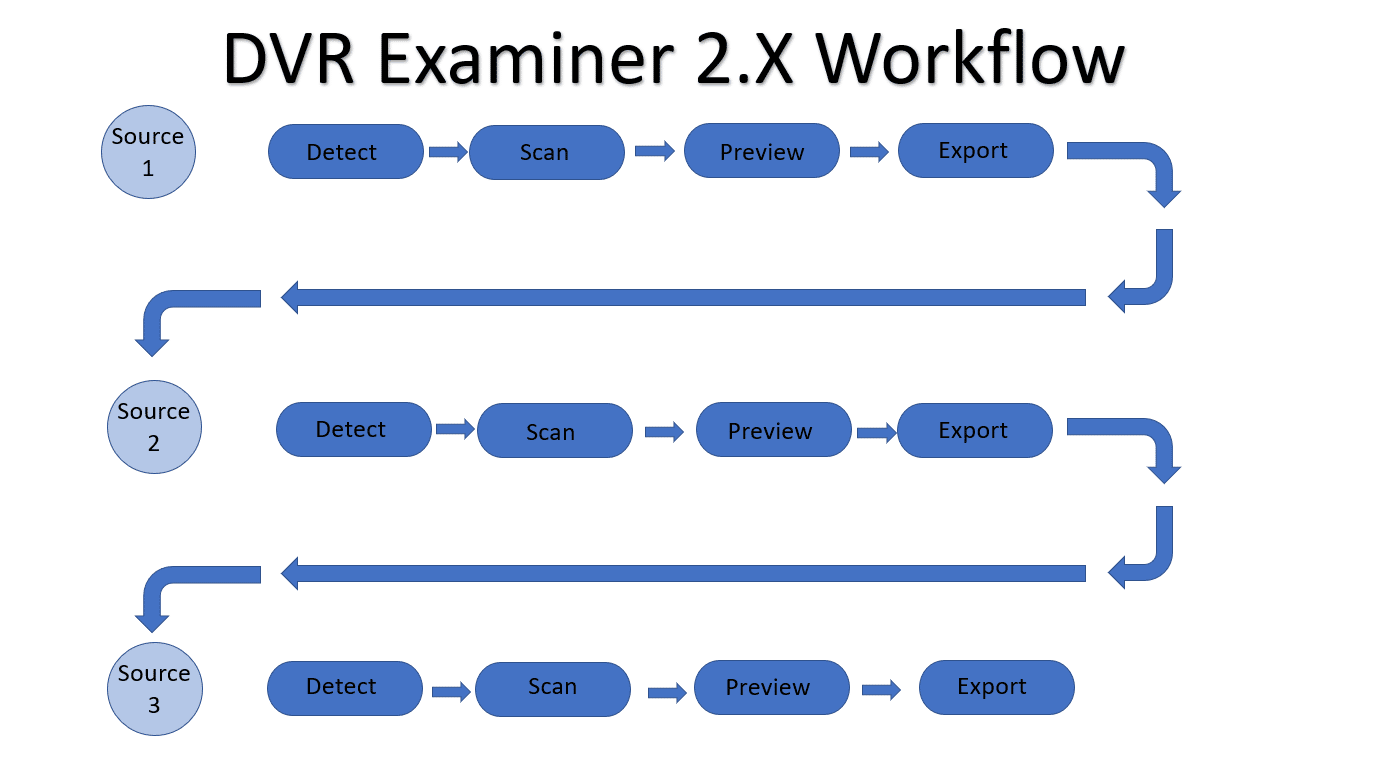
Figure 1. DVR Examiner 2.X Workflow
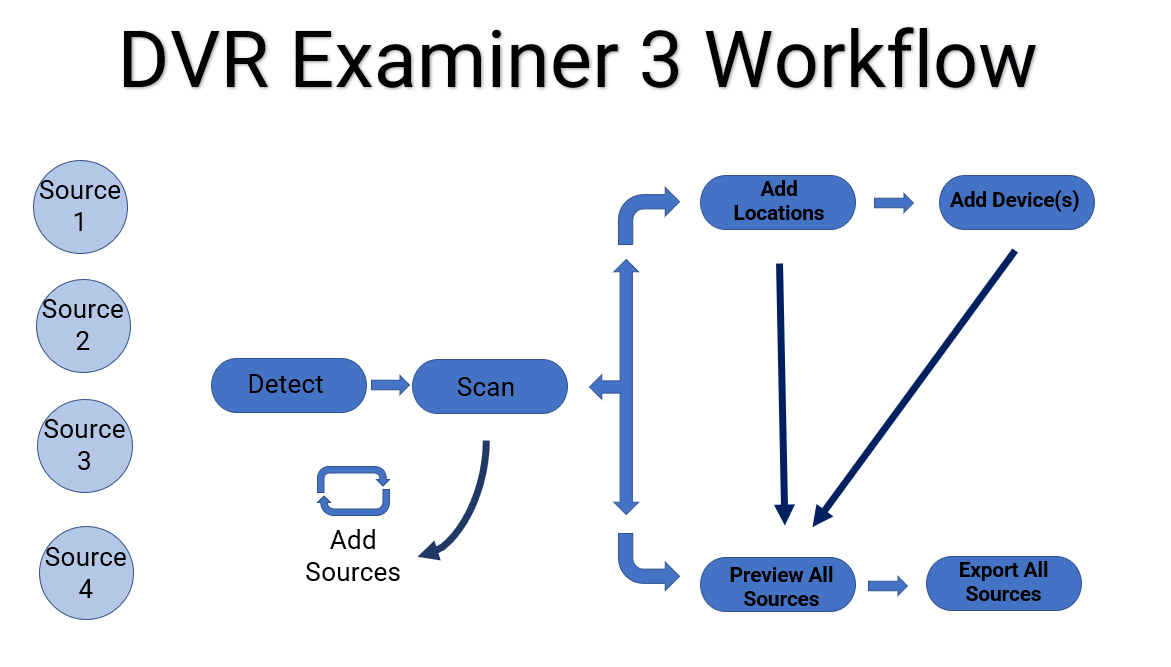
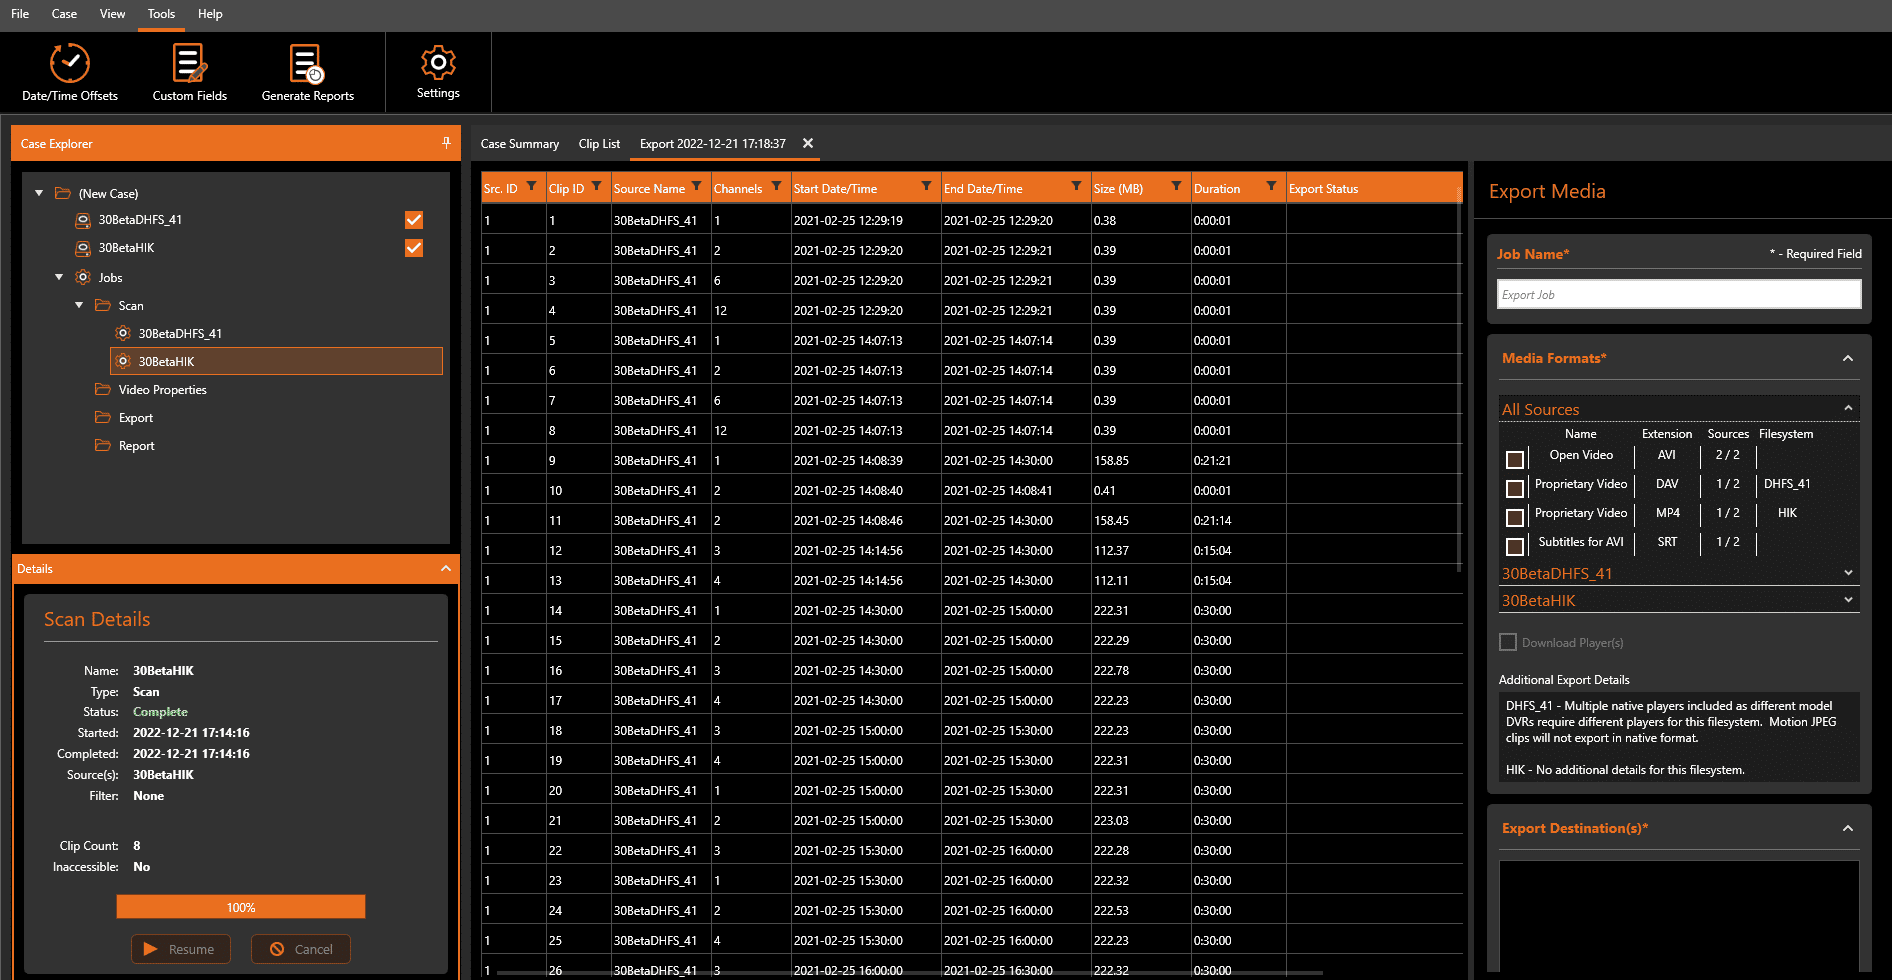
In contrast, DVR Examiner 3 let’s use forge your own path to the ultimate end goal of exporting recovered footage. As you can see in Figure 2 below, the first major change is DVR Examiner 3 is the ability to add multiple sources to a single case. Rather than having to repeat the same workflow for each source, you can detect and scan any number of sources before moving forward to the next step in the process. What’s more, once all sources have been scanned, you can then proceed by adding additional case details, such as incident details, device information, and relevant locations, or you can proceed straight to previewing and/or exporting video from any or all sources scanned.
Let’s take a look at the major feature improvements that contribute to improved workflows in DVR Examiner:
- Improved Speed
- Scan Options
- Clip List
- Date/Time Offset Manager
- Reporting
- Exporting
Improved Data Recovery Speed
As mentioned, in DVR Examiner 3 users can scan multiple data recovery sources in a single case, ultimately decreasing time to evidence. Users can also recover data from a single source more quickly, however, with scans consistently showing that DVR Examiner 3 is faster in both time to detect a filesystem and time to complete a scan. The video below demonstrates the difference in scan time for a scan of the same image file in 2.9.4 and 3.0.2.
Data Recovery Scan Options
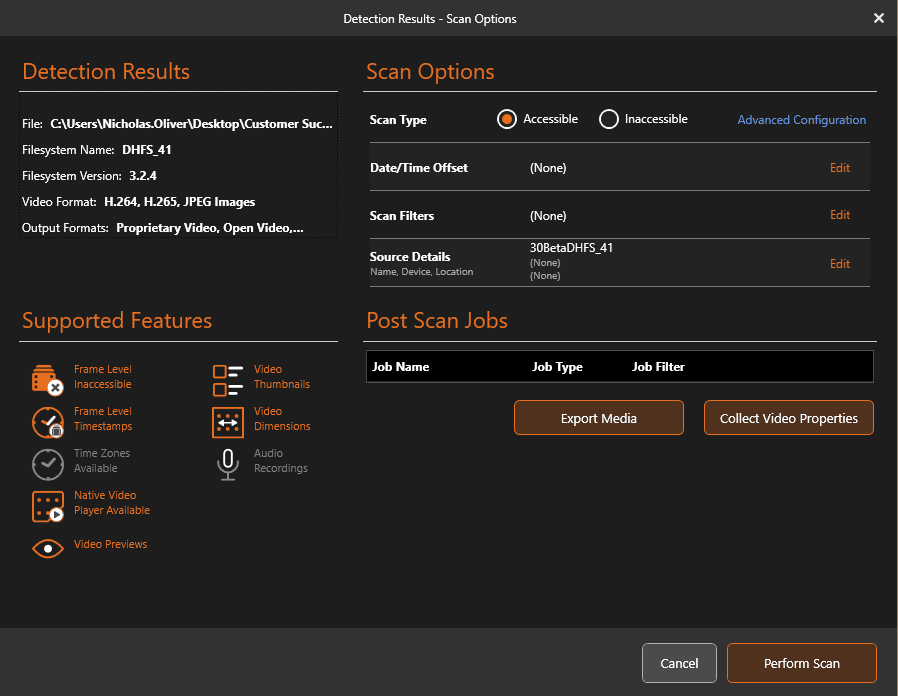
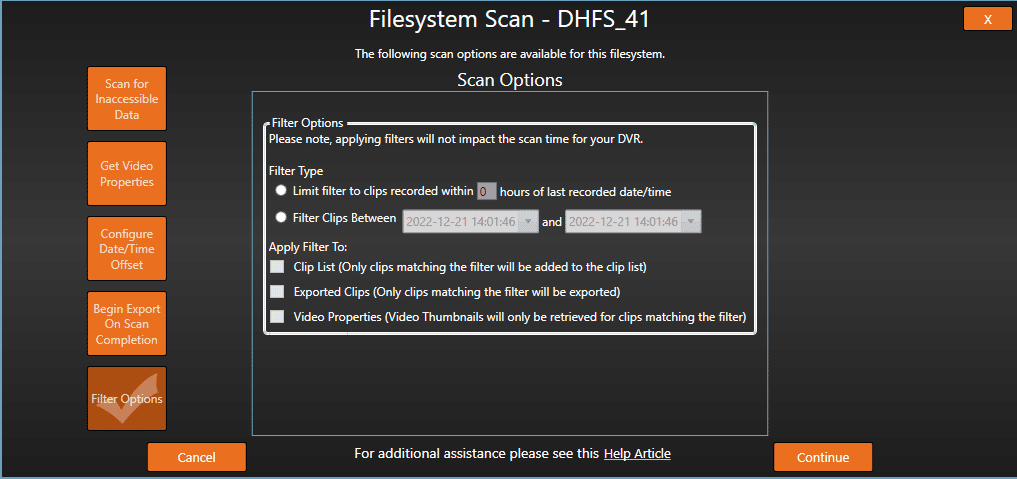
The Scan Options screen, which is now integrated into the Detection Results screen in DVR Examiner 3, offers the first opportunity for data recovery customization. As you’ll see below, there is a new Scan Option, “Source Details” available on this screen. Here, you can add information on Devices and/or locations specific to this source. Source details can also be added upon scan completion.
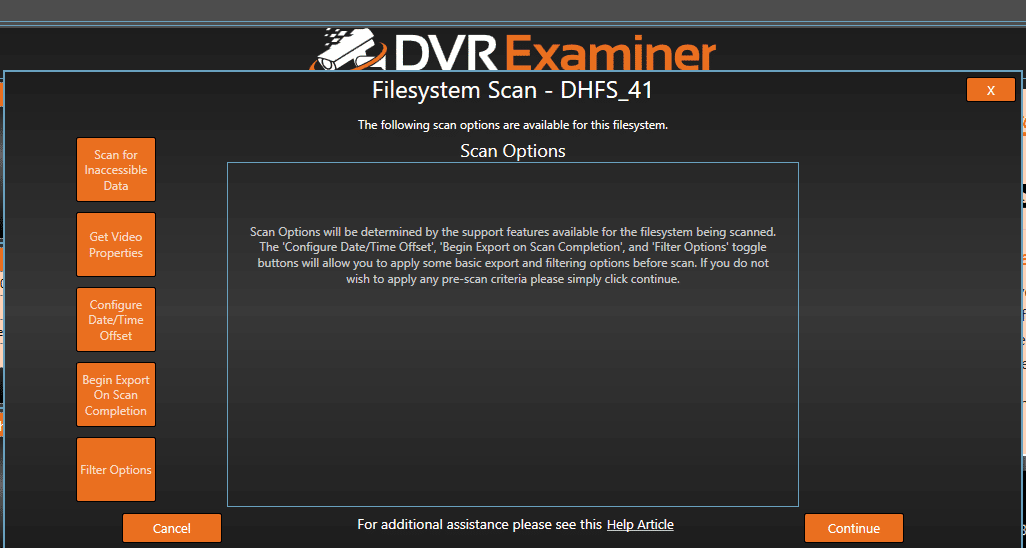
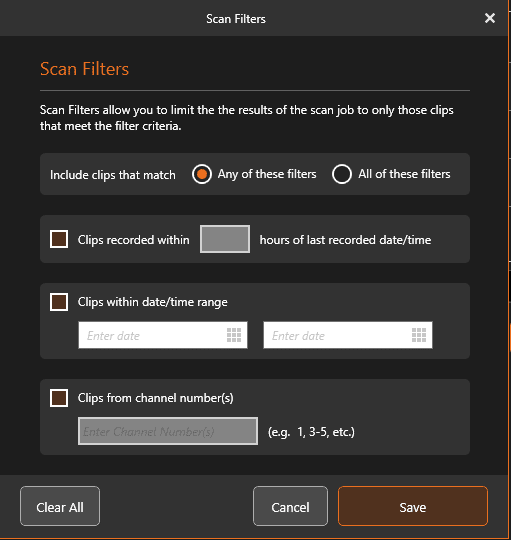
Another major improvement in DVR Examiner 3 is more control over the individual scan options that are applied. As you can see below, in DVR Examiner 2.9.4 all scan options would be applied at once, with no option to save individual options before scanning, and no option to clear entries. In DVR Examiner 3, as you select individual scan options, a separate pop-up window will appear allowing you to specify criteria, with a “Save”, “Cancel”, and “Clear All” option to reset your selections prior to proceeding with the scan.
As you can see with the “Scan Filters” example below, DVR Examiner 3 also allows a greater degree of customization, allowing you to set multiple scan filters and specify if clips should be return when they match any of all of these filters.
Clip List
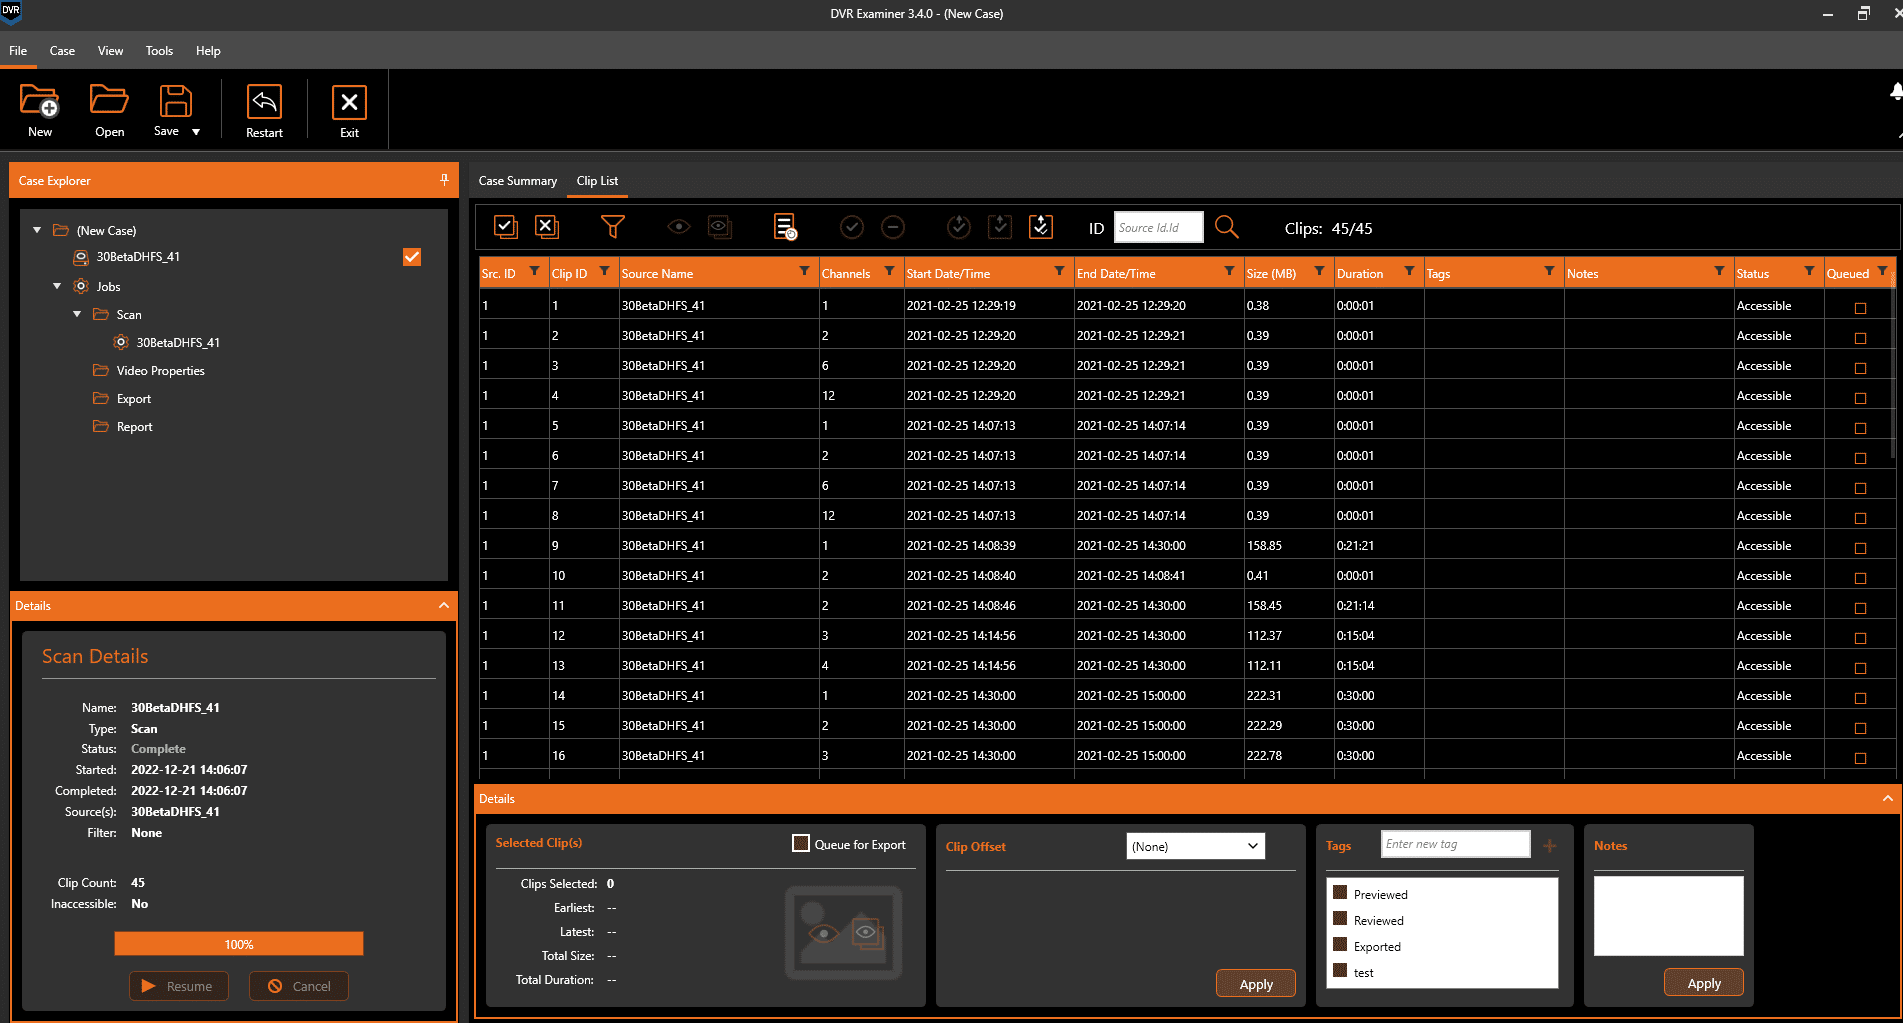
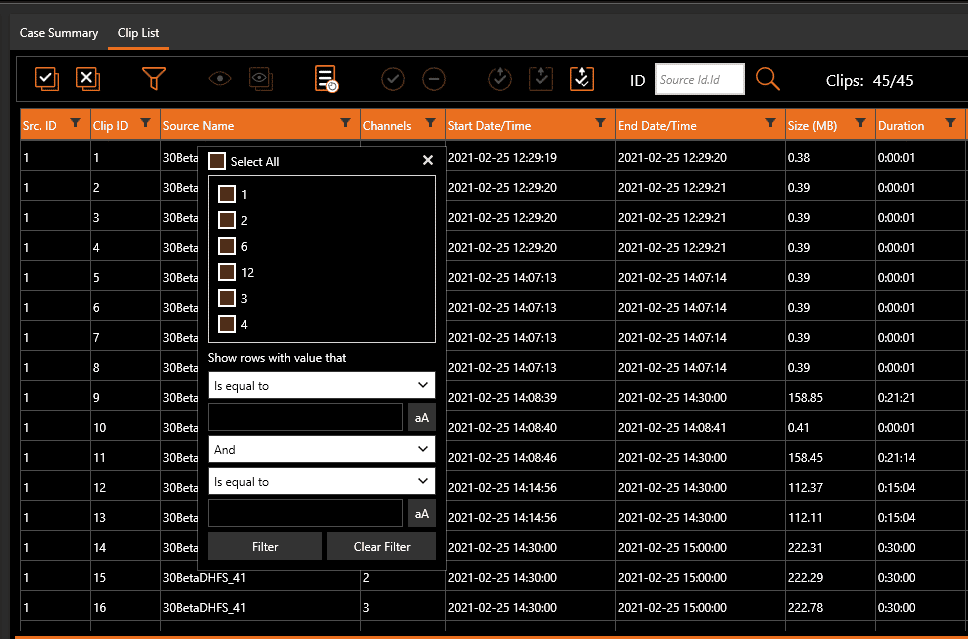
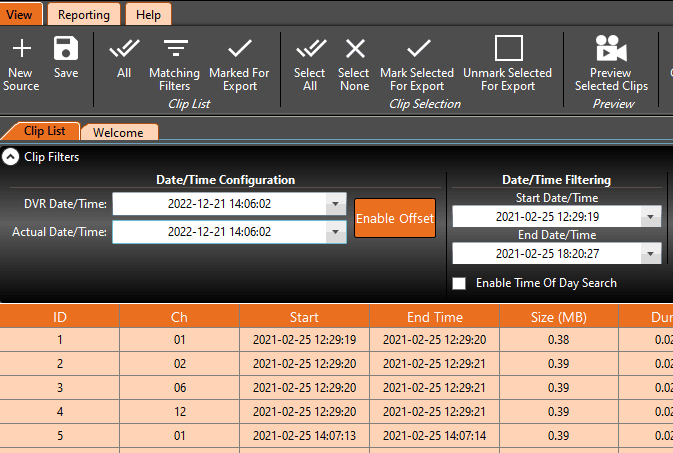
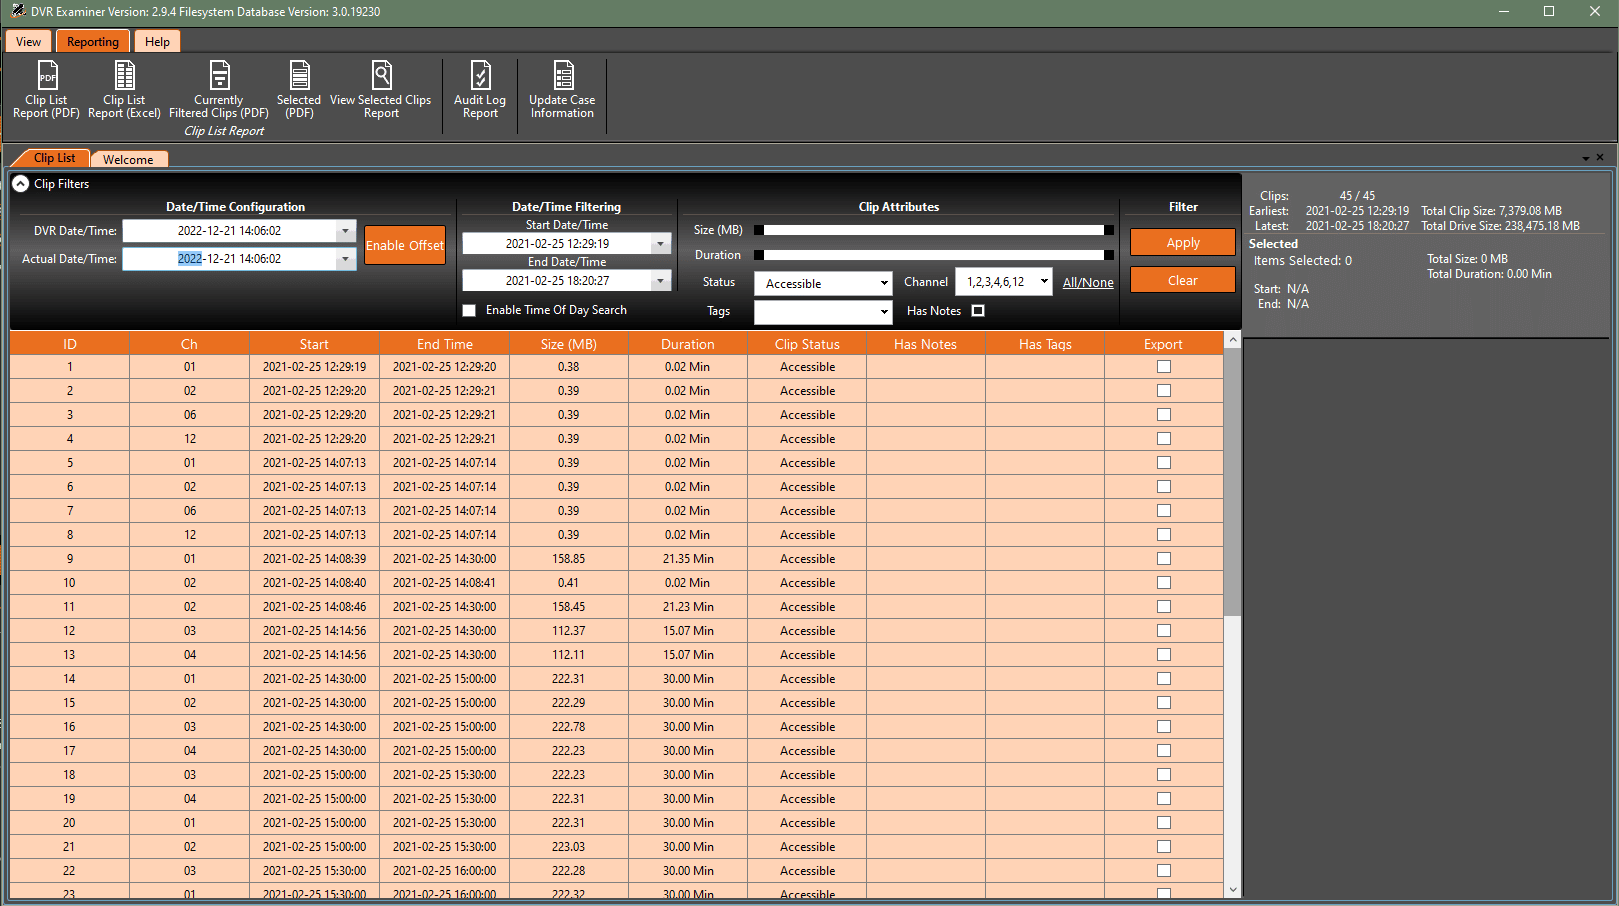
The Clip List in DVR Examiner 3 includes some additional major updates to both available fields and filters. To accommodate support for multiple sources, the Clip List now includes a field for Source Name and Source ID. There is also a quick search feature for Clip ID, which allows you to quickly locate a specific clip. Previously, users would have to scroll the Clip List, which could contain hundreds of clips, in order to locate a specific clip. Another update to the Clip List involves Tags and Notes for individual clips. In previous versions, the Clip List would simply display a check mark if a given clip had a tag or note attached to it. In DVR Examiner 3, any specific tags or notes will be listed in detail in the clip list, allowing users to quickly identify clips of interest without filtering.
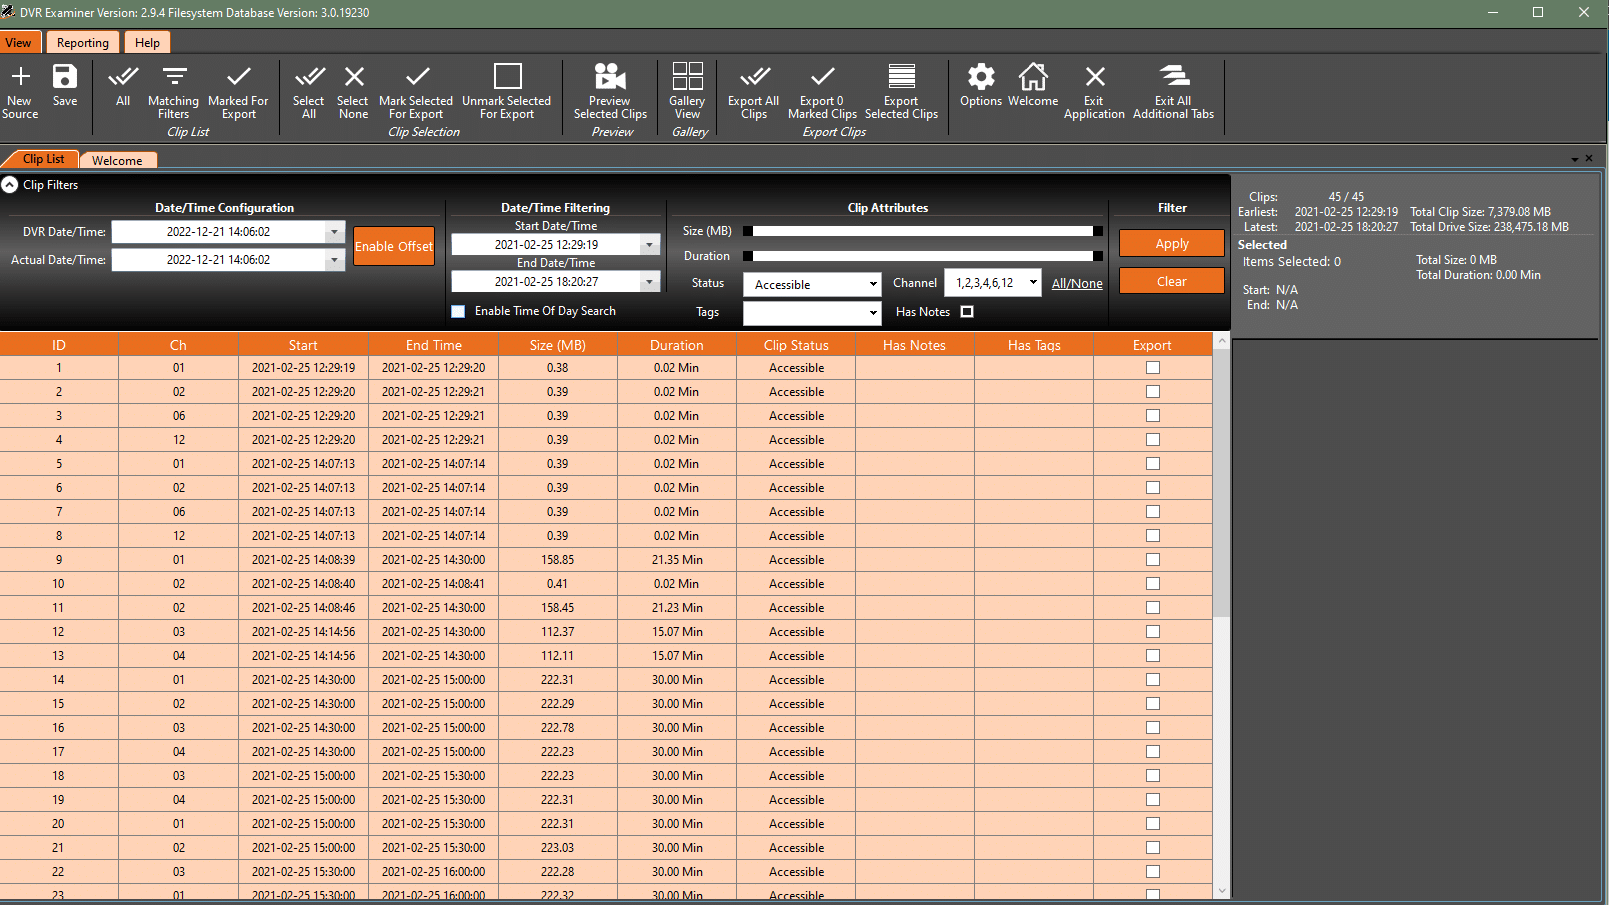
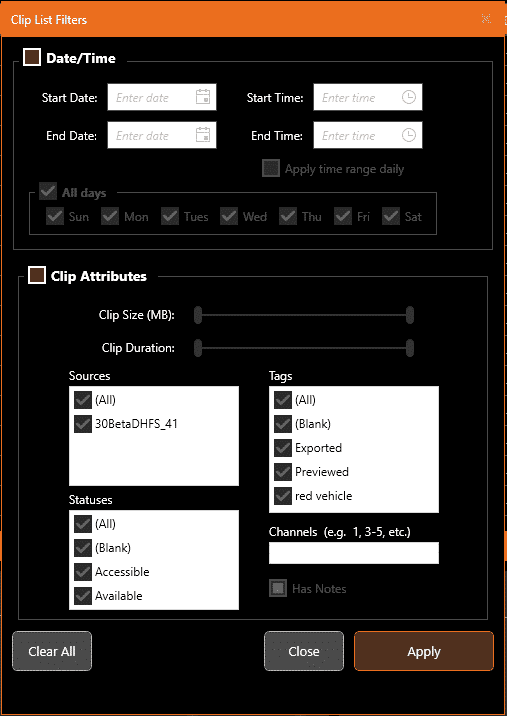
Clip List filtering also underwent an overhaul in DVR Examiner 3, providing a more intuitive and streamlined experience. As you can see in Image 6 above, past versions of DVR Examiner displayed a collapsible Clip Filters section. In DVR Examiner 3, filters can be applied in one of two ways. First, you can select the filter icon which produces a pop-up window to specify filter criteria (Image 7). If a filter is applied to the clip list, this filter icon will appear highlighted.
The second method for filtering is to filter directly from the Clip List columns, similar to what you would see in a classic spreadsheet. If you set a filter to a given column, the filter icon for the column itself will appear highlighted. Lastly, the column filters offer advanced filtering options, allowing you to filter for an exact match, values that are greater than/less than, notes that contain a certain phrase, etc.
Date/Time Offset Manager
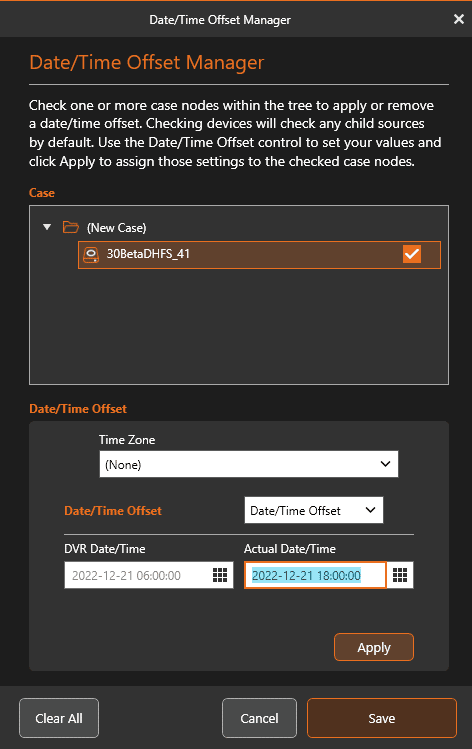
Much like DVR Examiner 2.X, users can set a Date/Time Offset in DVR Examiner. In DVR Examiner 3, you have the ability to set a separate Date/Time Offset for any sources included in the case. Users can now specify time zone, and the offset itself can be set in one of two ways. First, users can create a Date/Time Offset by specifying the DVR Date/Time as compared to the Actual Date/Time. Second, users can set a Time Span Offset by specifying how many days, hours, minutes, and seconds the DVR date/time is off by.
Reporting
Prior to the release of DVR Examiner 3, users would utilize the “Reporting” tab in DVR Examiner for all reporting needs. In DVR Examiner 3, users can create reports from directly within the Clip List by selecting the “Generate Report” icon from the Clip List. Another key difference in DVR Examiner 3 is that users can no longer create a report based on “Selected” clips. Reports will be created based on the clips included in the Clip List, so to create a report for specific clips, users must simply filter clips accordingly.

Exporting
The last major update in DVR Examiner 3 has to do with exporting. With multiple sources supported in DVR Examiner 3, users will see an option to select export media format for each source included in the export. What’s more, users can specify multiple export destinations in DVR Examiner 3. This is particularly useful in instances where an agency might have a default save location for all cases across the department, but an individual user would like to save a separate copy for their own records.

Hopefully, this blog helped to highlight some of the key changes made in DVR Examiner 3 which empower users to customize their DVR Examiner experience in a way that works best for them. If you’re interested in hearing more, check out our recent Webinar on this topic!