
Understanding Messages in Apple’s Cloud & Processing Warrant Returns
In iOS 11.4.1, Apple introduced the feature of Messages in iCloud. While not default, many users have enabled this option to back up their messages outside of their standard iCloud backup functionality. This could lead to finding retrievable data on different devices, which could be beneficial during your investigations.
In this blog, we’ll explore the different ways users’ data syncs across the ecosystem, how it can be retrieved, and how you can use free tools, like the MAGNET Apple Warrant Return Assistant to help.
Syncing Across Apple’s Ecosystem of Devices
When a user selects the option pictured below, a trigger event is sent to Apple and the messages on that device (both SMS and iMessages) are backed up to a separate container outside of your standard iCloud backups. They still count against your total storage limits even though they are outside the backup.
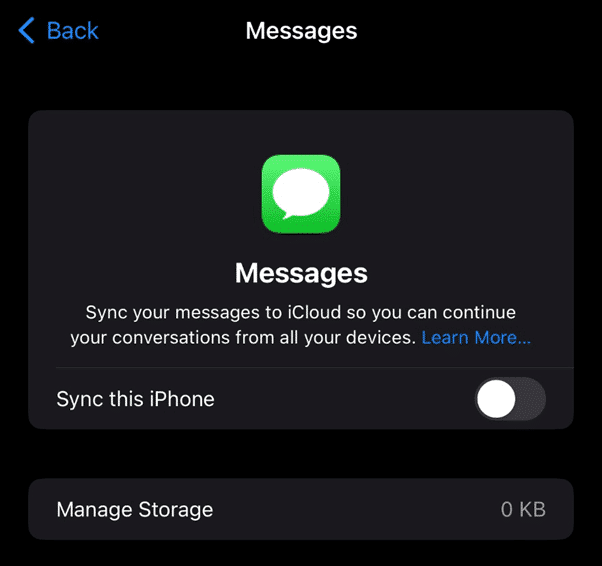
What’s the point of doing this if it still counts against your total storage count? This allows for “true” syncing across Apple’s ecosystem of devices. But haven’t messages always synced?
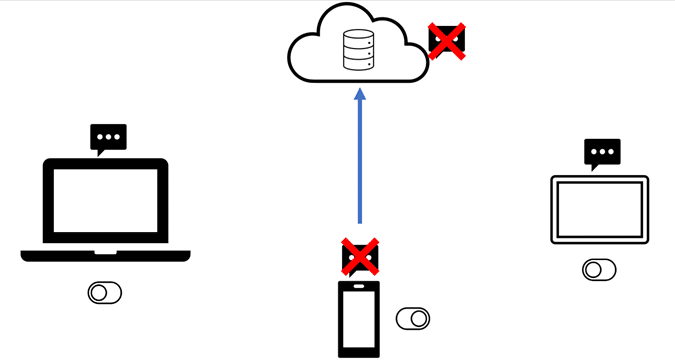
Yes, and no. By default, we can consider iOS/macOS devices to be using asynchronous syncing. The data is all synced to all the required parties, but once there, changes to that data are not made. For example, if someone sends me an iMessage, and I have an iPhone, an iPad, and a Mac, that data goes from Apple’s servers and gets stored on each device.
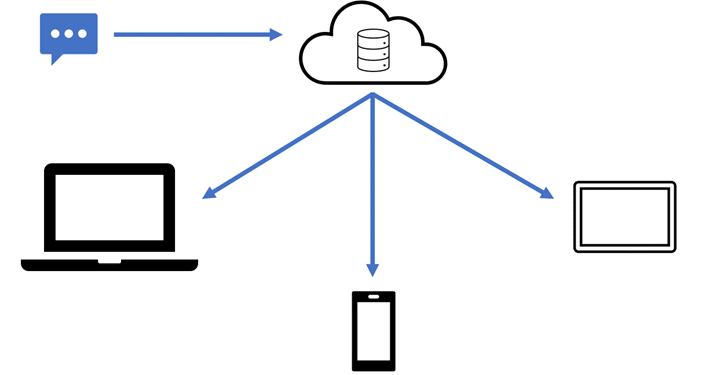
If one of those devices, say the iPhone, sends an iMessage to another user the data goes to Apple’s servers but is then synced back to the user’s other devices.
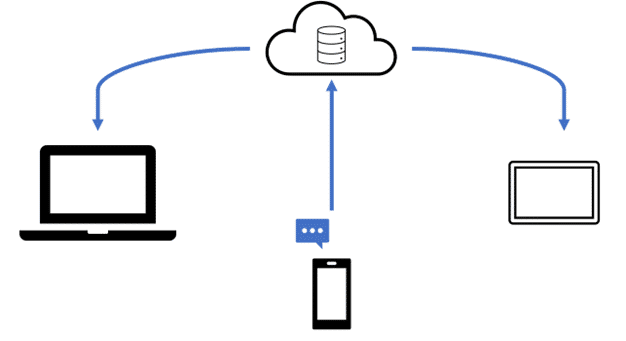
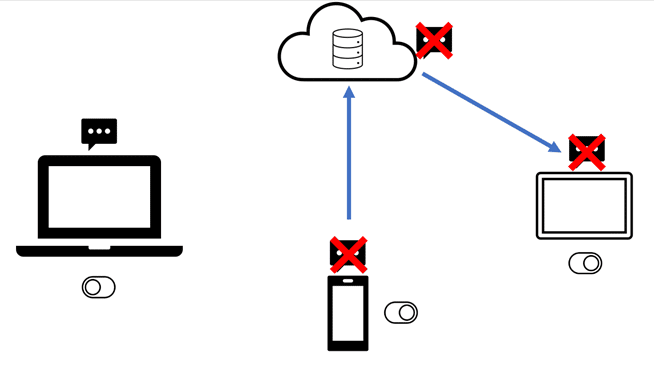
Syncing is the same if the feature is on or off. However, when the feature is turned on, changes such as deletes are also synced. Note: this feature has to be enabled on each device. If Messages in iCloud is only enabled on one device, changes such as deletes are only synced on that device and Apple’s cloud storage. The messages will still exist on the devices where the feature is NOT turned on.
If multiple devices have the feature enabled, all of those devices will have the delete data synced. This does not just affect iMessages. SMS/MMS messages are also treated the same way.
Access Data From iCloud Backups
All of this directly impacts what users will be able to extract from iCloud. Even if this feature is turned OFF on a device, and completely disabled, this will not automatically put it back as part of the iCloud backups. When the data is not available within the iCloud backup, the correct file is pulled but it will be 0 bytes.

Apple states that you have 30 days to download your data from this separate bucket once you disable the Messages in iCloud feature. These messages, once disabled, will download directly to your local device. In testing, this did NOT move the data back into the iCloud backup as one would expect. Testing occurred after 24, 48, and 72 hours without any changes. Additional testing showed that a device that was restored ONLY from iCloud backup did still contain messages so there may be a bug in which even after disabling them, Apple is still storing them separately.
In devices where this feature was NEVER enabled, messages still appeared to be backed up as part of the iCloud backup process. When a freshly wiped device was restored from an iCloud backup, messages were present post setup.
Apple’s Advanced Data Protection
Apple unveiled its plans for Advanced Data Protection of iCloud data at the end of 2022. This feature started rolling out in the United States with plans to expand to the rest of the world in early 2023. In short, this new feature will extend the same end-to-end encryption used for iCloud backups to many other cloud features such as iCloud Drive.
With standard data protection that is enabled by default, Apple stores copies of your keys so that the data can be decrypted, and Apple can assist you in recovering your lost data. However, under the new Advanced Data Protection, the keys are now device-based and are not backed up to Apple. This means that if you lose the ability to access your account, Apple cannot assist you in recovering the information. This also puts several hurdles in place for forensic examiners accessing this information as well.
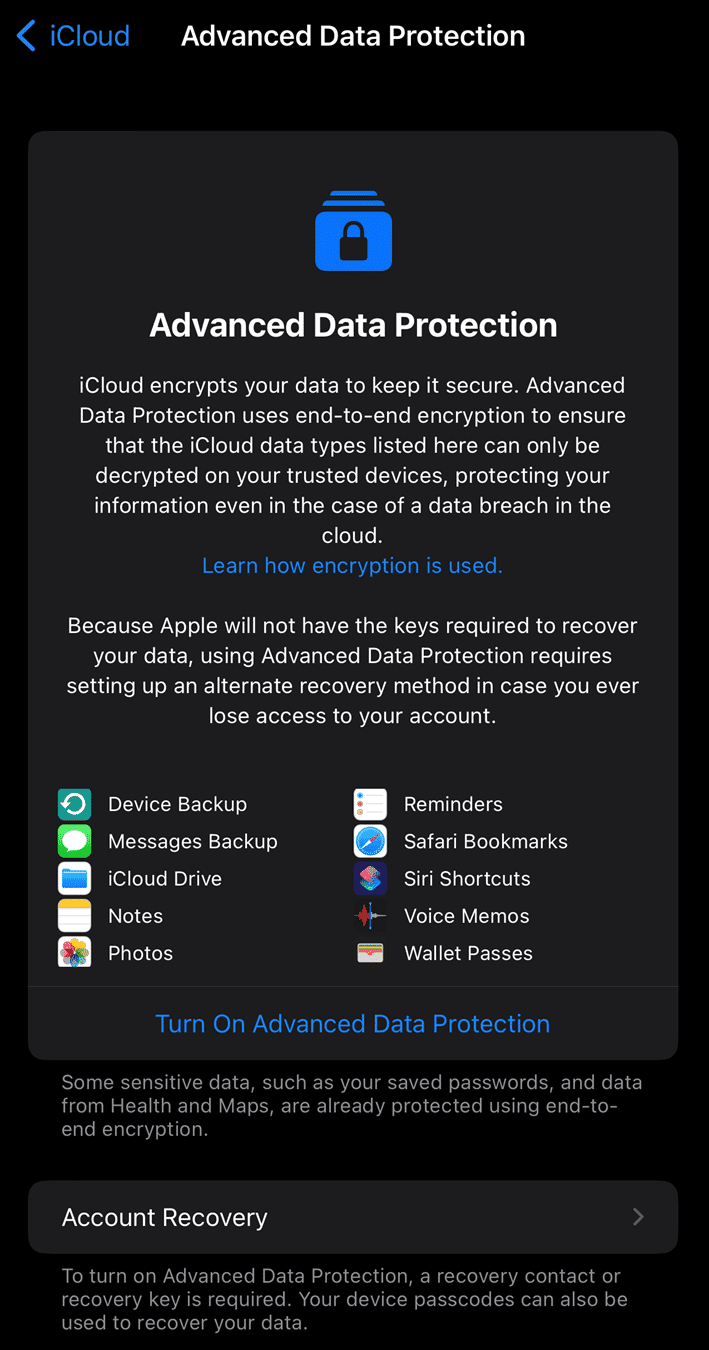
Since Advanced Data Protection is not enabled by default and must be manually enabled by users, it’s important to understand the steps that must be taken by an end-user before they can use it. First, a user’s account must have two-factor authentication enabled, which is a default setting for many accounts and once enabled, a grace period of two weeks exists to revert before it is permanent.
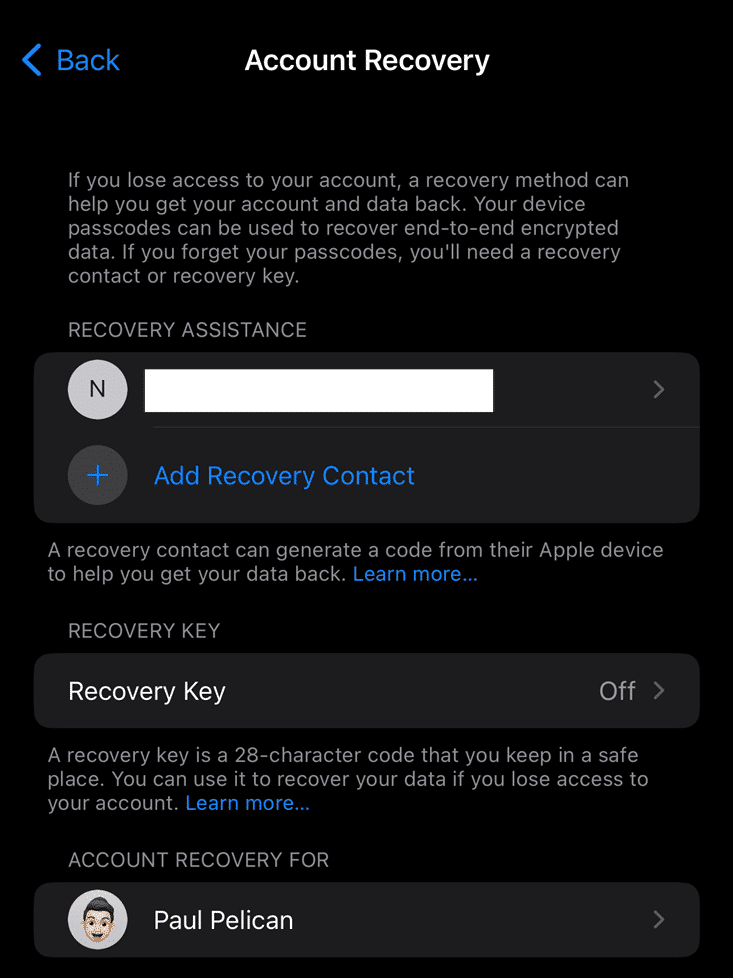
The next step is that a user will have to create a “recovery contact” where they invite an individual to be their point of contact to assist them gain access to their data. This contact invitation is sent via iMessage and requires the other participant to use an Apple device in order to generate a code to help you regain access. Members of the same family sharing group are recommended—but not forced—and up to five recovery contacts can be set. If a user chooses to not want to use a recovery contact, they will be forced to instead use a recovery key. This recovery key is generated by Apple and is a 28-character code that must be manually stored somewhere. If this method is chosen and the user forgets their recovery key or loses it, Apple will not be able to help restore access to the data.
Devices on the user’s Apple iCloud account must also be running specific versions of iOS/macOS as the final step in the process. iOS devices must be running iOS 16.2, macOS devices must be running macOS 13.1, and Apple Watch users must be running watchOS 9.2. If any device on the account is not running one of the mentioned versions or higher, users will not be able to enable Advanced Data Protection until they are removed or upgraded.
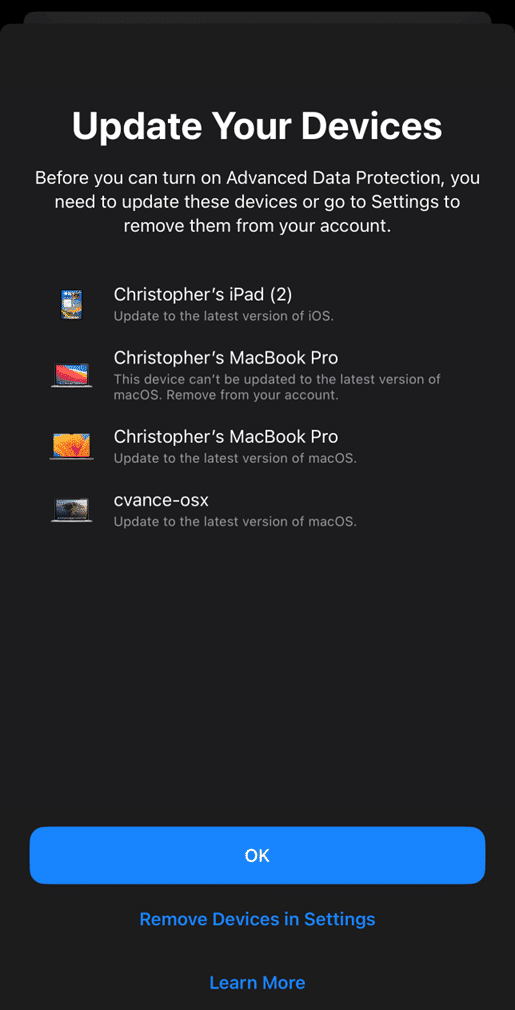
Once all these criteria have been met, the user can finally enable Advanced Data Protection. This process can be enabled from any of the enrolled iOS or macOS devices from the iCloud settings area. Once this toggle switch is turned on, nothing really happens visually to the user. However, behind the scenes, the keys from the device(s) are captured and stored so that only trusted devices can now decrypt the protected cloud data.
If this setting is enabled, forensic examiners now face an additional hurdle. Normally, iCloud stores the keys needed to decrypt the data within iCloud and can be accessed just using the account credentials. With advanced data protection (ADP) enabled, these keys now are basically pointless and stored on the trusted device only. Forensic examiners will likely still be able to connect to the account, but when it comes time for downloading the data, they will either not be able to download it, or if they can, potentially not be able to decrypt it without those on-device keys.
So how can examiners gain access back to the data? At this time, the only known way to do so is to temporarily disable ADP on the account reverting the data back to standard data protection, but there are some things to consider with this. First, you would need access to one of the trusted devices, which would likely be needed to gain the two-factor authentication code. Second, the device would have to be on the network in order to communicate with Apple’s servers and ask for the disabling of the feature. When the feature is turned off, the device will upload the required keys to Apple’s servers allowing the data to be decrypted again and will once again return to using standard data protection.
It is not currently known if this setting will impact Apple’s warrant returns, but it is possible that data within those will also be encrypted.
Apple Warrant Returns
If the messages aren’t in the backup, how does this affect Apple warrant returns? When data is turned over to investigators via the warrant return process, the data will be stored in a separate container outside of the backup containers. Let’s explore the warrant return structure first to better understand how these containers work and the proper way to load them.
When Apple returns a package, it will be in a .zip file named “[APPLE_CASE_REFERENCE]_production_[DATETIME].zip.gpg” where the APPLE_CASE_REFERENCE is a number assigned by Apple and the date and time is the generation of the file. Before going any further, this file needs to be decryptyed using the GPG password provided by Apple. You can use a free tool such as “Gpg4win” to decrypt this file on a Windows system. This will then produce a decrypted copy of the .zip file.
This .zip file is fairly small and will contain correspondence between Apple and the requesting individual, the search warrant, .XLSX files relating to the requested account information, and a .XLSX “Data Guide” file that walks through several of the identifiers for the account .xlsx files. There will also be a folder called “Account_Data_Links” that doesn’t provide the requested data but does require what we need for the next step, which is the path to the data.
Within the last few years, Apple has moved away from a single, large download package in favor of storing the information on internal cloud storage and allowing the requesting officer/agency to then download the files. The folder contains several .HTML files with links to the packages stored on the cloud servers. However, these are still the ENCRYPTED versions of these files where Apple is using GPG encryption. They provide the passcodes to the requesting individual in separate communications.
Apple also provides a .bash script and read-me instructions on how to use the script. This .bash script will automatically reach out and download each of the .GPG encrypted files, and decrypt them for the user with the known password, after you have performed the necessary steps and installed all the required additional packages. It’s a straightforward, but technical, process. While this will download the files and decrypt the GPG protection, it will not do anything to the iCloud backups—those will still be separately encrypted. Files will remain broken into segments and may need to be combined before loading into your forensic tool of choice. More on this later.
A .CSV file within this .zip container also contains all the links, paths, SHA256 values, and when the links are set to expire. This file will be used by the script to know where to get the files from. Apple stores each of the .GPG files within an AWS bucket.
Using the MAGNET Apple Warrant Return Assistant
Another option would be to use the free Apple Warrant Return tool from Magnet Forensics. This tool allows you to simply drag and drop the original returned .zip file, provide the GPG password from Apple, and it will do the rest.
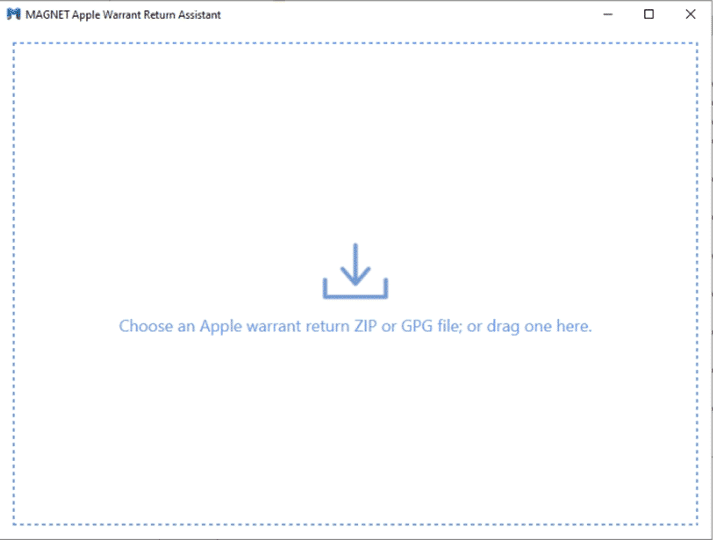
Instead of the original decryption in Gpg4win, you can start by taking the original .GPG file and dropping it into the Warrant Return Assistant. The assistant will ask for the decryption password provided by Apple and the selected storage folder.
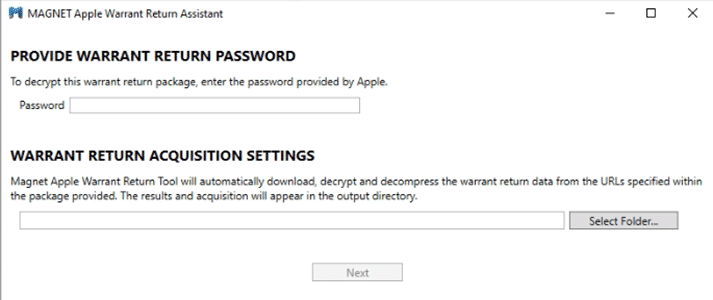
You need to make sure the folder you are pointing it to is empty. If the output folder is not empty, this will throw an error message.
The Warrant Return Assistant then iterates through the provided links from the previously discussed .csv file and outputs the content on the screen. It will also take stock of how much disk space is available within the chosen path, so examiners can see if they need to redirect it.
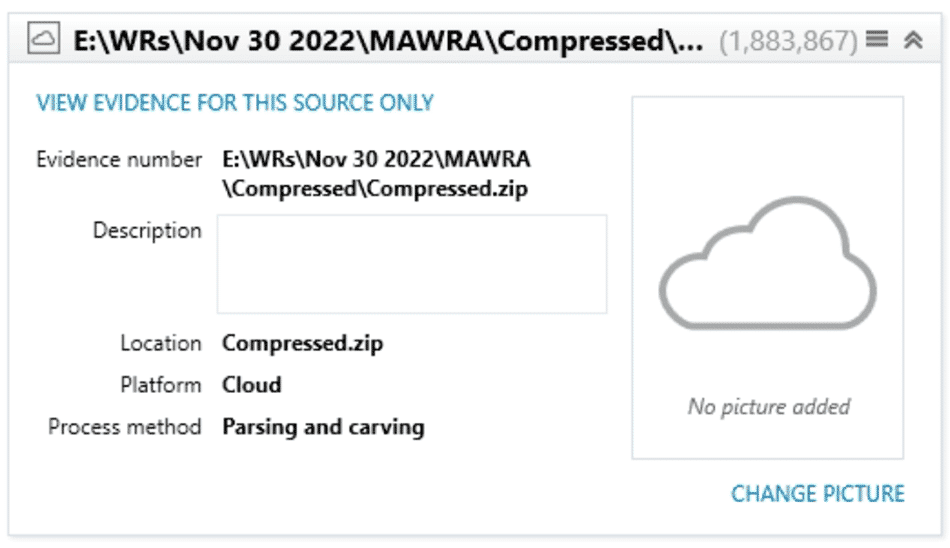
As the files are downloaded, it will check the integrity of the file to make sure it is going to match the included SHA256 files before decrypting it. This program will download, decrypt, and most importantly, repackage the files into a single “Evidence.zip” container for loading into our forensic tool. This is especially important for the iCloud backups.
If you downloaded the data using the Apple Warrant Return Assistant, it has done the heavy lifting for you. Now you can load the data into AXIOM using the workflow, Cloud à Add Evidence à Apple à Apple Warrant Return. NOTE: The iCloud backups are still encrypted separately from the GPG protection. Using the proper workflow in AXIOM will decrypt this data. Using the Mobile à Apple à Load Evidence à Image / Files & Folders will NOT decrypt the backups.
Contents and Structure of iCloud Backups
Speaking of the iCloud backups, let’s explore the contents and structure of these backups. The main issue with the iCloud backups within a warrant return, is that Apple will segment these files typically into 1-2GB file chunks. Examiners will need to manually recombine these containers back together into a single container, or folder, to process them. This is because the backups are still encrypted, and the decryption key is only stored within one of the segments. This key is the “keyBag.txt” file. Without this file, the backups can’t be decrypted. It contains the key for each device that is in the backup storage.
Each .zip segment will contain a folder path: [DSID]\[Apple Return Value]\[Apple ID]\backup. The devices are listed out with D_[UDID] where each device is separated with its UDID value. Inside the D_[UDID] folders are S_[Snapshot_Hash] where each S_ folder refers to a specific snapshot of the iCloud backup for that device. It is common for each device to have 2-3 snapshots of the backup within iCloud. Once these files have been combined back together into a single container/folder structure, the data can be loaded as a warrant return in Magnet AXIOM.
But what happens if your iCloud backups don’t contain the iMessage/SMS data? If the user has enabled the Messages in iCloud setting as originally discussed, the data will exist in a totally separate container. This .zip (or .gpg file you downloaded it manually) file is called “[Apple_Request]-MESSAGESINICLOUD-[File_Segment_Number].zip” and will contain a file called MessagesInICloud.csv or a MessagesMetadata.txt file (which may be within a zip file). The .csv (which is actually not a csv at all) is the one you want to make sure you’re processing. The metadata file contains information about the messages, but not the contents of the message itself.
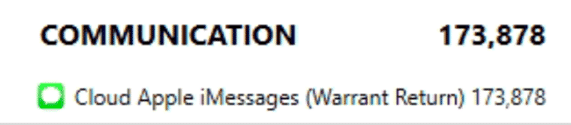
AXIOM will accept either the .zip files containing the Messages or if you’ve used the Apple Warrant Return, it will automatically parse the data from within the Evidence.zip starting with version 6.9. The data will be returned under the COMMUNICATION category under an artifact called Cloud Apple iMessages (Warrant Return). This artifact will function just like any other parsing of the iMessage data from an iOS/macOS source and will also have a chat threading preview as well as Conversation view and filtering as well!
What About the Rest of the Warrant Return Data?
From our examinations, there’s lots of new stuff to add to our existing artifacts coming down the pipeline. But as it sits today, we parse out all the iCloud Backups. If you’ve used the Apple Warrant Return Assistant, it’s done the hard work and pre-packaged all the data into a singular .zip file. When that’s loaded, AXIOM will detect the proper keys for each backup and automatically decrypt them for you the contents.
If you haven’t used the Warrant Return Assistant, and are doing the process manually, it’s still possible with a little extra work. Once you have downloaded all of files in the links document given to you by Apple, or run the script they give, you need to locate all the files that are called [Return_Reference_#]-BACKUP-[SEGMENT-#].zip. The Return Reference # should match what is at the top of your links document, and the Segment # seems to be a running value of the segment files Apple is returning. These files will contain the D_ and S_ folders for each device and snapshot of those devices but only one will contain the keyBag.txt file that is needed.
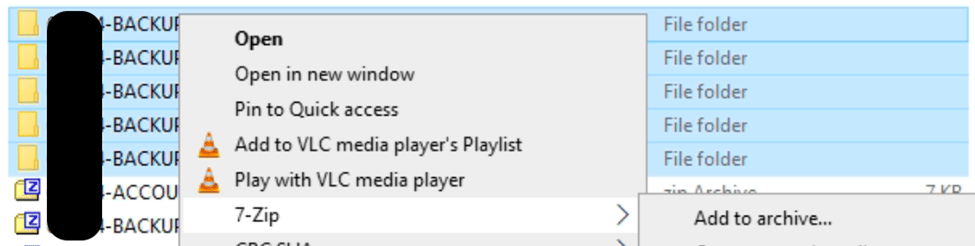
One way to recombine them is to use 7zip to first unzip them to disk and then rezip them. With 7zip installed you can right-click all the backup files and use the Extract to \* option.

Once the files are all unzipped, you can use the same right-click option with 7zip and use the “Add to archive” option to recombine them into a singular .zip. The folder structure of each of these zips are the same so it will merge them all together correctly when re-combining them.
Once all the files have been merged back together you can use the workflow in AXIOM, Cloud à Load Evidence à Apple à Apple Warrant Return, and point it at this one .zip file you created, and AXIOM will decrypt and parse the backups. It should be noted this is not the gpg decryption, as that step should already be done, but iCloud backups are separately encrypted by Apple which we can decrypt.
Remember that iCloud Backups are becoming more limited in what they store. Apple has potentially moved data such as Contacts, Call Logs, Notes, and Safari history data outside of the backups into separate containers. If this has occurred, those will be in separate .zip files within the warrant return, similar to Messages in iCloud if that’s been enabled.