
Using Keywords with Magnet AXIOM
Keywords are an essential part of many forensic examinations. While running keyword lists shouldn’t be the extent of an investigation, the right keyword list can help examiners quickly get to the relevant evidence for their case.
Magnet AXIOM allows examiners to run several different keyword searches either before or after processing your case. Let’s take a look at some of the options available.
Keywords in AXIOM Process
Examiners will usually have keywords they want to run against the evidence at the start of their investigation. In AXIOM, individual keywords and lists can be loaded before processing. Once you load your evidence, the first processing option is to add keywords.
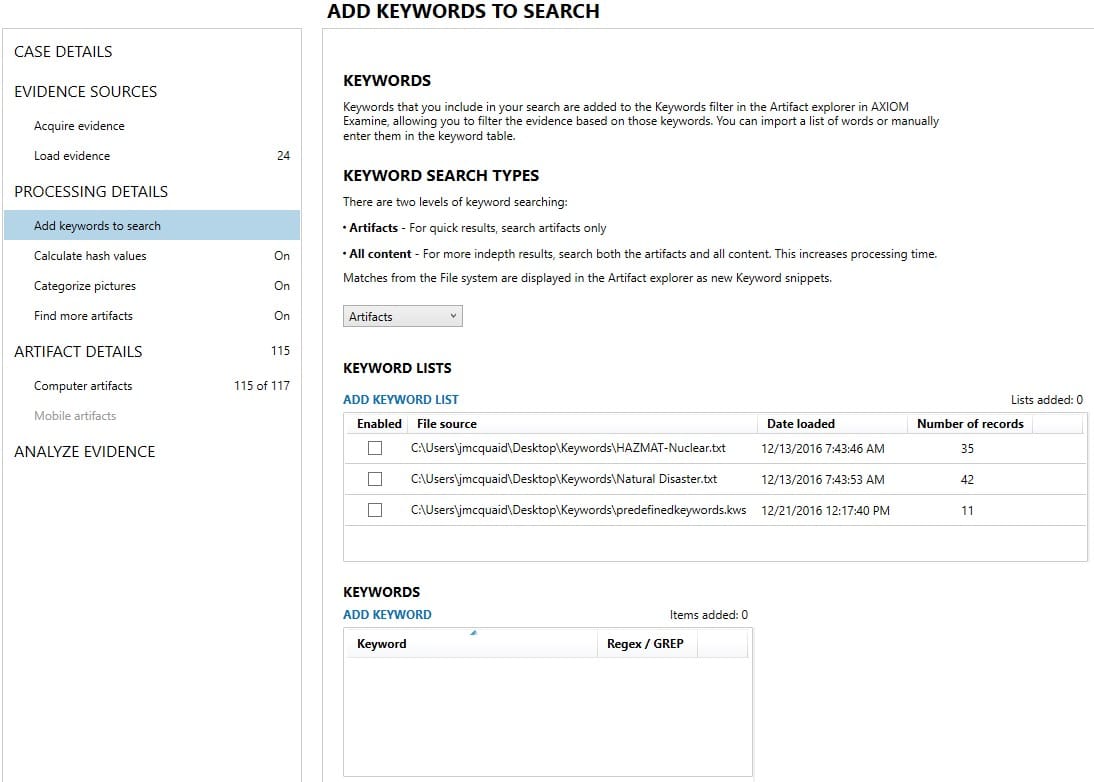
You can add keyword lists by clicking the link “ADD KEYWORD LIST” and then point AXIOM to either a line-separated text file or a .kws file (.kws is a simple format that allows you to save regexes or other keywords while keeping their settings — a .txt file also works.) The list gets loaded and it will stay persistent across cases in AXIOM. You can choose to either include the list in your case by checking the “Enabled” box, or uncheck it if you don’t want to include it in your search.
You can also add individual keywords below by clicking “ADD KEYWORD” which will allow you to add a single keyword or regex to the case. Single keywords are not persistent between cases.
Regex/GREP
You can create regexes to look for common strings that may be important to your investigation as well. When adding a regex as a keyword, make sure you check the “Regex/GREP” box so AXIOM knows to treat it like a regex and not a normal string.
AXIOM uses the .NET regex schema so depending on how your regexes were created, you may need to edit them slightly to comply with the .NET format. For more information on the .NET regexes, see here: https://msdn.microsoft.com/en-us/library/hs600312(v=vs.110).aspx
Here’s a list of common regexes that we use, feel free to use these or create your own:
Visa Credit Card 4[0-9]{12}(?:[0-9]{3})?
MasterCard Credit Card 5[1-5][0-9]{14}
American Express Credit Card 3[47][0-9]{13}
Diners Club Credit Card 3(?:0[0-5]|[68][0-9])[0-9]{11}
Discover Credit Card 6(?:011|5[0-9]{2})[0-9]{12}
JCB Credit Card (?:2131|1800|35\d{3})\d{11}
North American Phone Numbers ((\(\d{3}\) ?)|(\d{3}-))?\d{3}-\d{4}
Email Address [\w-]+(?:\.[\w-]+)*@(?:[\w-]+\.)+[a-zA-Z]{2,7}
Web Address (((ht|f)tp(s)?://)|www.){1}([\w-]+\.)+[\w-]+(/[\w- ./?%&=]*)?
IPv4 Address (25[0-5]|2[0-4][0-9]|1[0-9][0-9]|[0-9]{1,2})(\.(25[0-5]|2[0-4][0-9]|1[0-9][0-9]|[0-9]{1,2})){3}
Dates (?:\d{1,2}([\/\\-])\d{1,2}\1\d{4}|\d{4}([\/\\-])\d{1,2}\2\d{1,2})
Artifact vs. All Content Keyword Search
In addition to the string/regex options, you also have an option between searching “Artifacts” or “All Content.”
The “Artifact” search is the quicker of the two options and will search anything that gets picked up as an artifact during processing including chats, documents, emails, etc. This is a great option when the majority of what you want to search through is included as one of our artifacts.
The “All Content” search is a deeper search across the entire disk similar to how other forensic tools might conduct their searches. It does not concern itself whether the keyword is found in a particular artifact or area of the disk, it will simply search for the string in whatever encoding type that is chosen and identify any matches. When selecting “All Content” searching, it will allow you to choose which encoding types you want to include — starting with a basic ASCII search but also including UTF-7, UTF-8, UTF-16, UTF-32 for either the entire list or individual keywords.
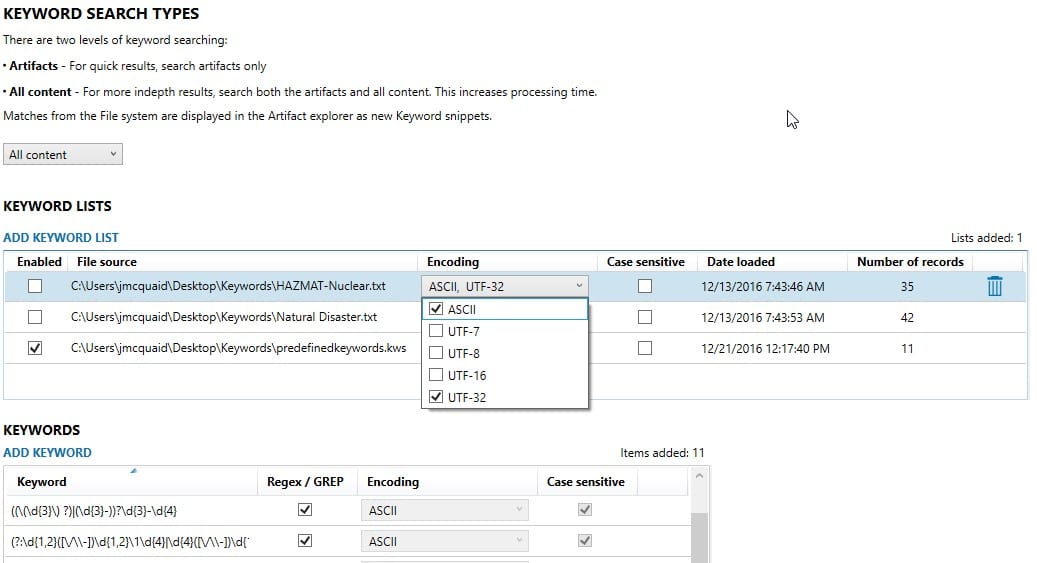
This type of search can take quite a bit longer, depending on how many keywords you have included and how many encoding types you’ve checked off, so be prepared for the increased processing times.
Both the “Artifact” and “All Content” searches have their benefits and drawbacks. Artifact searches are much quicker and will include content from apps or data that may by encoded or encrypted. If AXIOM knows how to decode or decrypt the content, then those keywords will be picked up in an artifact keyword search but may not be detected in a full content search by other tools. However, if the keyword is found in data that isn’t an artifact or not recognized by AXIOM, it won’t be picked up in an artifact search. In contrast, the “All Content” search will take much longer as it searches the entire disk for each keyword in each encoding type selected, but it will pick up additional keywords not found in an artifact. Both searches have their value and use in a given case — it’s up to the examiner to know when to use which search in specific scenarios.
Luckily, if you want to do additional searching after the processing is complete, AXIOM Examine allows you to run additional keywords during your analysis.
Keywords in AXIOM Examine
Viewing Artifact Keywords
If you processed your case with an artifact keyword search enabled, you can view these keywords from the Artifact Explorer by going to the Keywords filter across the top bar, selecting the dropdown and choosing either the Keyword List that you loaded, or the individual keywords you wish to display.
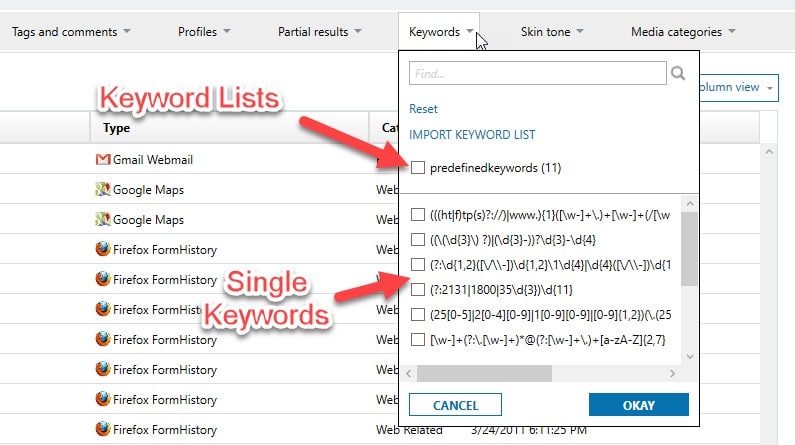
Selecting these will apply a filter and only show you the artifacts that had matches to your selected keywords. The data that matches the criteria will be highlighted in either the metadata details or the content of the file.
Viewing All Content/File System Keywords
If you ran an “All Content” search during processing, your keywords are displayed a little differently. Because many of these keywords may not reside in any artifact, a new artifact category gets created along the left column called “Keyword Snippets.” Select the keyword or group of keywords you wish to look for, and it will display any keyword matches along with a snippet of data before and after the matched keyword. You will also get the type of encoding that it matched on and the location where the keyword was found.
Searching Additional Keywords
Perhaps your original search didn’t yield the results you wanted, or you were given additional keywords after you’ve already finished processing and wish to add them afterwards, you have a few options.
If you only have one or two keywords you wish to search, a quick search using the keyword search bar at the top right of your screen will quickly search any artifact (including the content of these artifacts such as documents, chats, and emails) for your matching keyword and apply a filter to only show those matches. Any matches within the metadata or content of the artifact will be highlighted to quickly show you the matching hit.
If you have more than a few keywords, you may wish to add a keyword list. To do so, go to the Keywords Filter across the top of your screen and select “Import Keyword List” and you can point it to a keyword file such as a line separated text file just like we did when loading them into AXIOM Process above. Those keywords will be searched across the artifacts and will be added to your other lists and keywords that you have previously searched.
Keyword searching in File System Explorer
Finally, you can also run keyword searches from the File System Explorer by using the same box in the top right corner that you used in the Artifact Explorer.
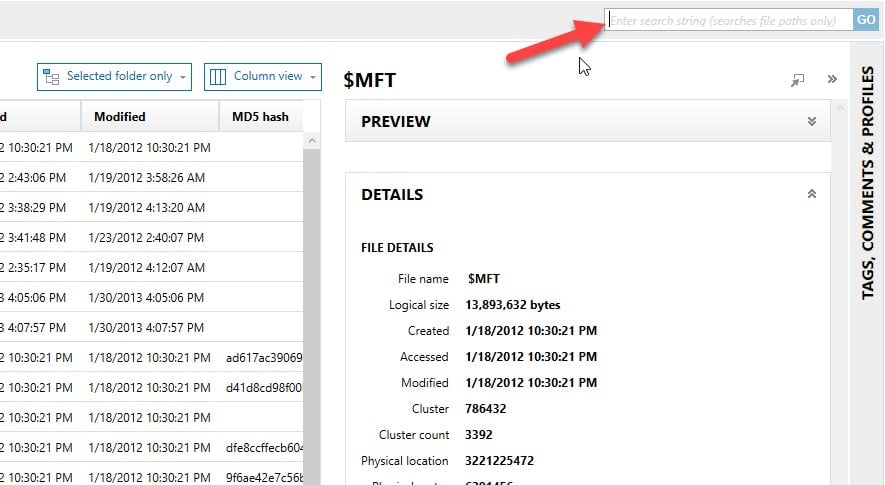
At this time, this search will only include file paths so, while it is pretty quick, it won’t do a binary search across files. We’re working on adding more functionality to perform additional binary searches from here, but for now you’ll need to re-process the evidence and use the “All Content” option to do any additional keyword searches.
Any questions? Please reach out to me at jamie.mcquaid@magnetforensics.com.
Jamie McQuaid