

How to Build a Windows 10 ‘Windows to Go’ Drive to Support Offline Collections With Magnet OUTRIDER and Magnet ACQUIRE
A bootable Windows to Go SSD that can boot and run Magnet OUTRIDER and Magnet ACQUIRE in dead-disk situations. Includes syntax to use Diskpart.exe to bring drive(s) to acquire online in Read-Only mode. The idea originated here, with documented changes and updates.
By incorporating other live response tools (RAM capture, EDD, Process Capture etc. on same drive) – you’re ready for [nearly] any (collection) situation.
Requirements
- High capacity/Speed USB drive, tested on Samsung T5 1TB SSD
- Rufus (open-source USB tool)
- A Windows 10 ISO file (if you don’t have one, this can help: https://www.microsoft.com/en-ca/software-download/windows10)
Process
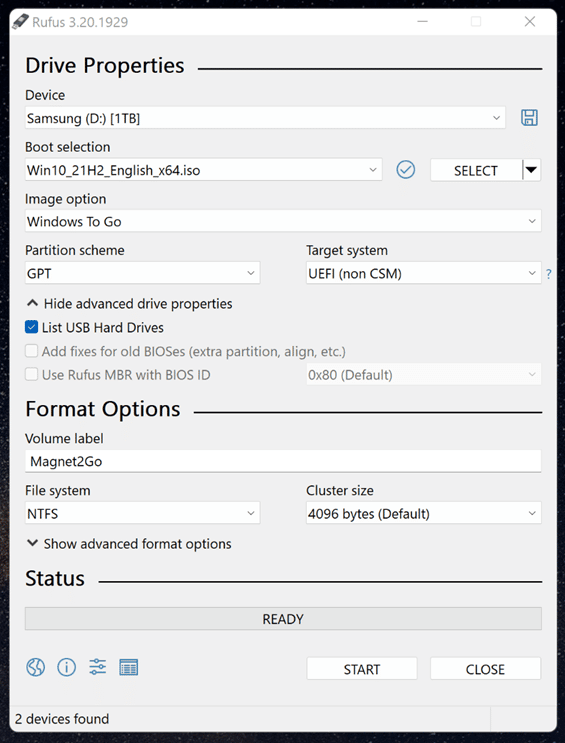
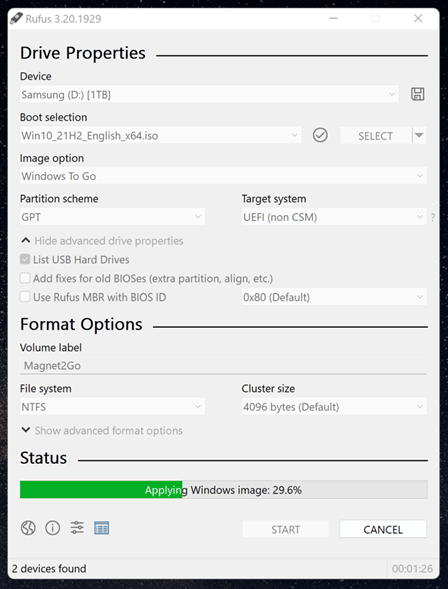
Launch Rufus and set the options as indicated below.
Device The USB drive you want to configure
Boot selection Browse to and select the Window .iso file
Image option Select Windows to Go
Note: you may need to select “List USB Hard Drives” in order to see the external drive as an option under Device.
Volume label Magnet2Go
Triple check your settings and then press Start. Changing certain options like the Image options can reset the Volume label information back to default.
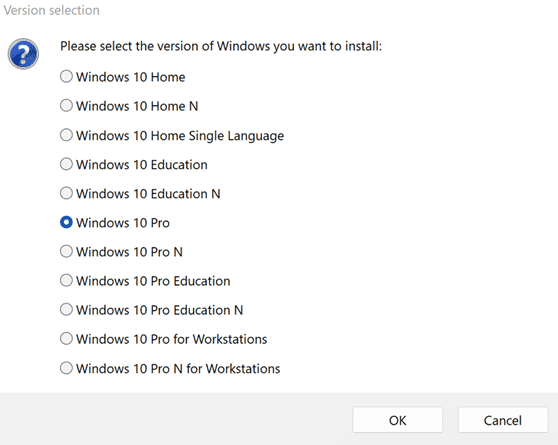
Based on your .iso media you will be prompted to select the version of Windows to install. For our purposes Windows 10 Pro will be chosen.
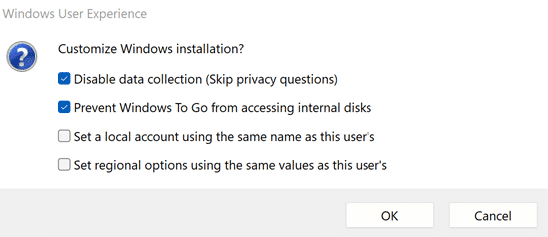
At the next set of options select Disable data collection & Prevent Windows To Go from accessing internal disks. This is crucial as we want any hard drives besides our boot device to initially be offline when we boot.
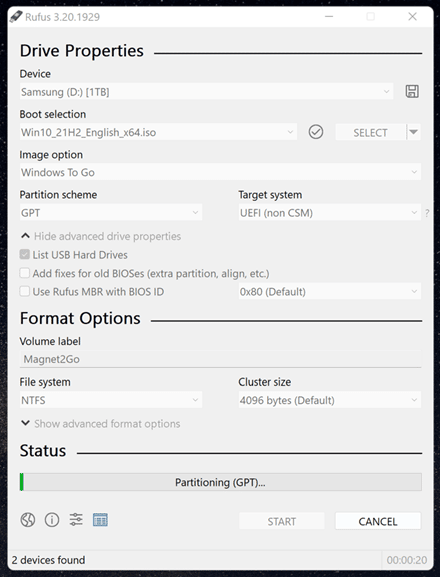
Once you hit OK, Rufus will start the partitioning and imaging process.
Once the process has completed successfully, (you’ll know when you see a CLOSE or OK), you can unplug the USB drive—but don’t do it just yet.
With the drive still attached to your computer, create a directory on the root called Tools. This is where we will copy any applications we want to run from our device.
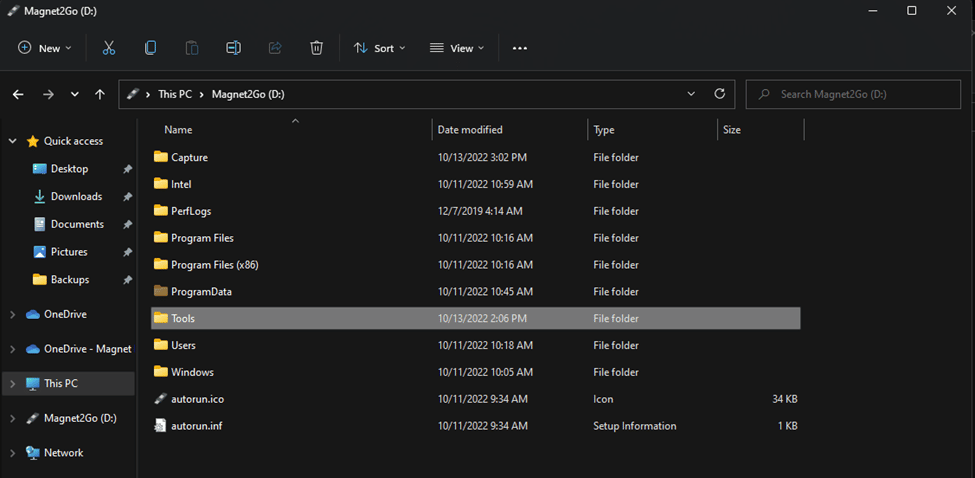
Suggested Tools
OUTRIDER – Once you’ve set up OUTRIDER on another USB device, you can copy the USB contents to the Tools folder.
Free trial: https://www.magnetforensics.com/free-trial/
Magnet ACQUIRE – Installer for the latest version of Magnet ACQUIRE. https://www.magnetforensics.com/resources/magnet-acquire/
Arsenal Image Mounter – (copied from existing installation); Not required, but it’s a useful part of a tool stack. https://arsenalrecon.com/downloads/

Live Response – The initial purpose of this drive is to be bootable so that OUTRIDER or ACQUIRE can be run when the computer is found off by running from bootable media. The same drive can be used to carry Live Response tools as well. Some examples are:
- Magnet RAM Capture: https://support.magnetforensics.com/s/free-tools
- DumpIt (Comae): https://www.magnetforensics.com/blog/how-to-get-started-with-comae/
- Encrypted Disk Detector: https://support.magnetforensics.com/s/free-tools
- Magnet Process Capture: https://support.magnetforensics.com/s/free-tools
- Magnet Web Page Saver: https://support.magnetforensics.com/s/free-tools
Whether the system is on or off, you’ve got a toolkit ready to go to support any collection.
One more file you’ll want to add is the latest version of Microsoft Visual C++ Redistributable (x64). This is a dependency for a number or the Magnet Forensics tools.
Once you’ve got all your tools and/or their installers copied to the drive (don’t worry if you forget something, you can add more tools later if you wish) remove the USB drive from the computer.
First Boot (Windows Configuration)
The next step will be to BOOT from the Magnet2Go USB drive. You can use the same PC you built it on, or another if you have one at your disposal. The options to boot from a USB device will vary by manufacturer. This can be set in the BIOS, or it may be a prompt during pre-boot (F8, F10, etc.) Safeboot may also need to be disabled in the BIOS if enabled.
When you boot from the device the first time, you’ll see the same setup options seen when setting up a new Windows installation; prompting you to set-up user/password; keyboard layout, language, etc.
Once Windows boots to the desktop, you can customize it to your heart’s desire. Run the VC-redistributable first and then the installer for Magnet ACQUIRE. Follow by running installers for any tools you want to be able to run when booting from the device.
Any customizations or changes you make to the Windows environment will persist on the USB device after shutdown. If you need to add tools, or make other updates, just boot to the USB device and make your updates.
Booting on the Target Computer
When booting from the computer you’re looking to investigate, you’ll follow the same USB boot process as previous (BIOS or F(#) options). Once Windows boots, you’ll see the environment as you’ve customized it.
Safely Accessing the Target Hard Drive(s)
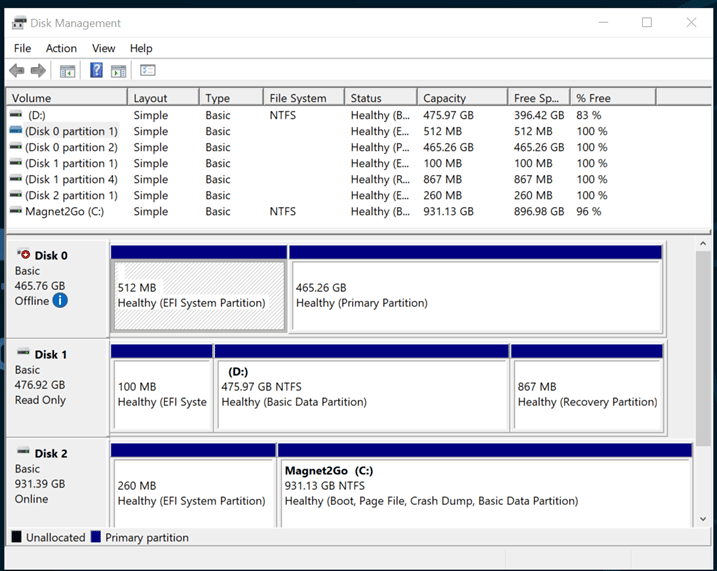
When we boot from Magnet2Go, any other drives attached to the system, will be Offline when we boot.
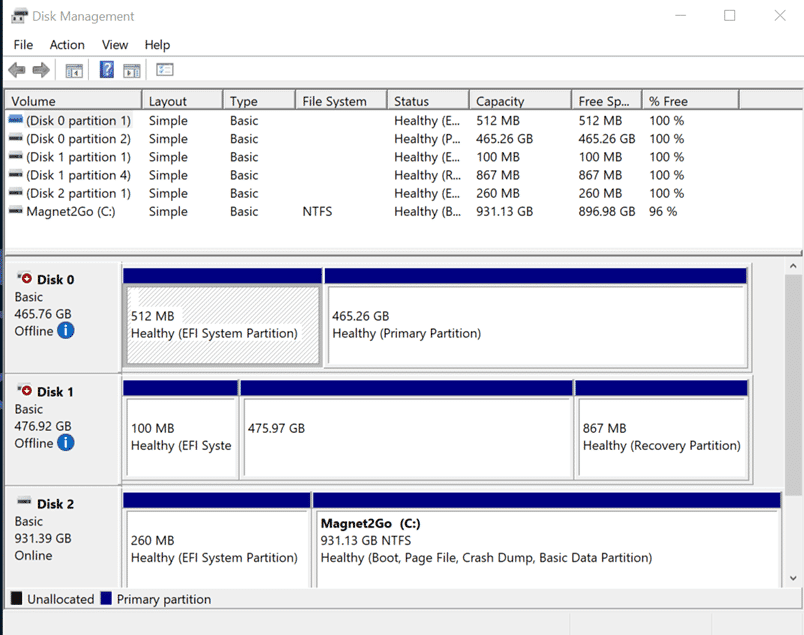
We can use the built in Windows utility DiskPart.exe to bring any of the drives we need to interrogate online in a Read-Only mode. Any of our tools or actions will not be able to write any changes to the target computer.
At a CMD or PowerShell prompt, type diskpart.exe
Diskpart Syntax
List disk will list the different disk sources attached to the computer. In this example there are 3 drives present. Disk 0 and Disk 1 are hard disks installed in the target computer. Disk 2 is the USB device we’ve booted from. In this case the drive I want to be able to collect from is Disk 1.
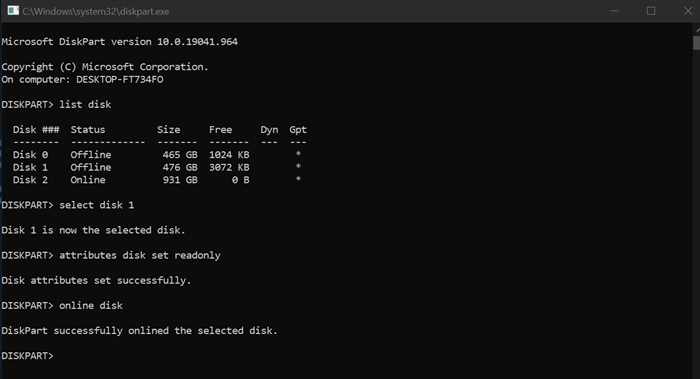
Select disk 1 will select the specified disk number
Once selected, attributes disk set readonly, will ensure that the specified disk cannot be written to once mounted.
Online disk will bring the disk online and make it available to Windows.
You can verify the status of the disks in Disk Management (diskmgmt.msc)
At this point, collection utilities against any of the mounted disks can be safely run. After your collection activities, shutdown Windows as normal. There should be no changes made to the device being captured.