Android Recovery Acquisitions with Magnet AXIOM
In previous versions of Magnet AXIOM, you were required to unlock and enable USB debugging for Android device acquisitions or use Magnet ACQUIRE to load your own custom recovery images.
Now, we’ve built this right into AXIOM, adding over 680 recovery profiles for Samsung devices with plans to add more in the future. Flashing a recovery image to an Android device will work on a phone even if it has a passcode lock, bypassing it completely and allowing you to acquire a full physical image of the device.
How to Get Started
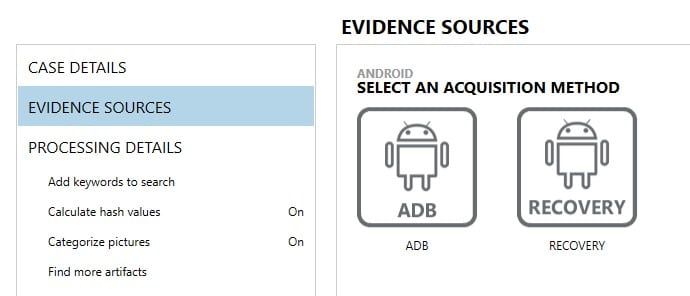
When loading a new evidence source into AXIOM Process, you’ll find a new “Recovery” option when acquiring an Android device (Evidence Sources – Mobile – Android – Acquire Evidence – Recovery).
NOTE: The ADB method will allow you to acquire either a Quick or Full image just like previous versions.
The new recovery method will work on several models but you must know the exact model of Android phone for it to work. The first thing you’ll need to do is download the recovery images from our website (the file is about 4 GB in size so it could not be packaged within the regular AXIOM installer). Just follow the link in AXIOM or go to www.magnetforensics.com/downloadrecoveryimages/ and download the zip.
Extract the files and run the installer and it will take care of the rest. The installer will install the recovery images to the last location AXIOM was installed to. For example, if AXIOM was installed to the default installation directory, the images will be installed to:
C:\Program Files\Magnet Forensics\Magnet AXIOM\AXIOM Process\RecoveryImages
Afterwards, AXIOM will list several models that are supported with recovery images, search for your model number here and select it.
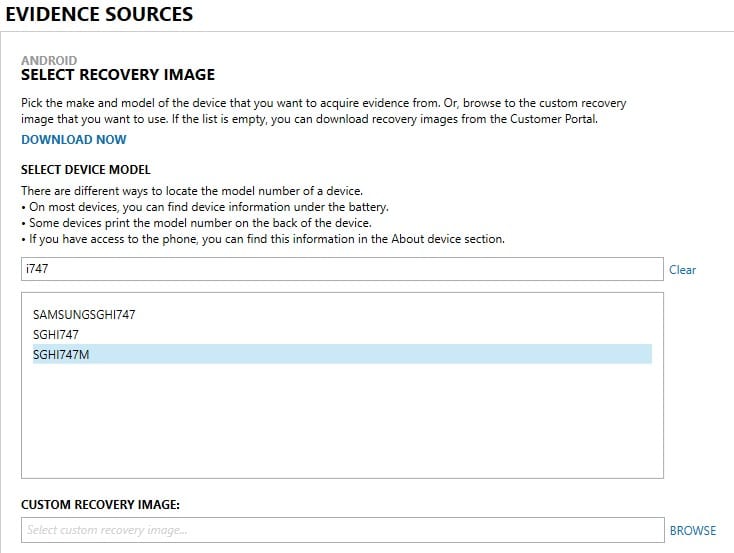
For this example, I’m using a Samsung SGH-i747M which is a supported device. I search for it, select it, and hit “next.” If your device isn’t supported and you have your own recovery image for it, you can load it in under “Custom Recovery Image.” NOTE: Be careful loading in your own recovery images as you will likely brick the device if a wrong recovery image is used.
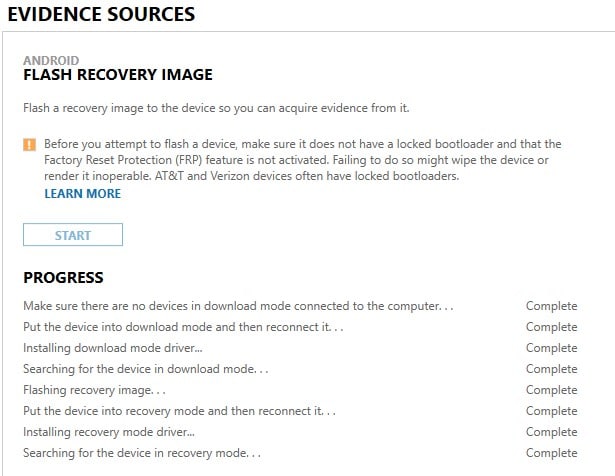
The next screen gives you a warning that there are risks associated with loading recovery images and to be sure you have tested and know it works for your particular model. Recovery images will not work if the device has a locked bootloader by either the manufacturer or carrier or if it has FRP (Factory Reset Protocol) enabled. Many carriers such as Verizon & AT&T lock the bootloaders to prevent recovery methods like this so just because you have the same model of phone for another carrier, doesn’t mean it will work for all carriers so make sure you double check to ensure that the device you’re examining does not have a locked bootloader.
To start the process, you will need to have the device disconnected from your computer and place it in download mode, typically by hitting the volume down button, home button, and power button at the same time (a special USB cable or adapter can do this for you also if you have one.)
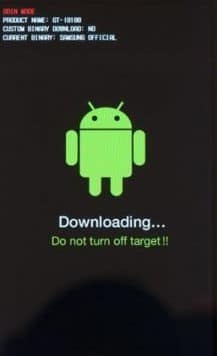
Once you have the device in download mode, connect it to the computer and AXIOM will detect the device. It will install a driver if needed, and begin flashing the recovery image onto the phone (you may see a blue progress bar on the device.) Once the image is loaded, you then need to put the phone in recovery mode. Power off the phone and then power it on by holding the volume up button, home button, and power button. The process will finish and look like this:
Hit “next” and then you will get a familiar screen allowing you to do a full acquisition without needing to input the passcode or enter into USB debugging mode. Note: Privileged Access has changed to “Yes” indicating that you have full access to the device to get a physical image.

From here, add the device to your case and continue just like any other acquisition or analysis with AXIOM. The device will be acquired and processed and you will get the results from a full physical image in the end.
Here’s a quick video showing the process with the same device above (SGH-i747M):
Additional notes: Frequently we’ll get questions around what changes are being made to the device with this process. This is a common method for mobile device recovery used by many tools. Most Android devices have a regular user data area that gets booted to every time the phone is powered on and under normal use. They also have a recovery partition similar to recovery partitions used for computers to help reset or restore factory settings.
Recovery images are flashed to the recovery partition which does change the phone but it only affects the recovery partition, not the user area. Once your acquisition is complete, restart the phone like normal and the user area will load just like normal and the user will not be impacted. The only noticeable changes are that the recovery image remains on the recovery partition and the Samsung KNOX will be tripped but it will not impact the use of the phone.
If you have any questions or comments, feel free to reach out: jamie.mcquaid@magnetforensics.com.