
Investigating iOS Phone Images, File Dumps & Backups
As of January 2013, Apple announced it had sold over 500 million iOS devices. While iOS seems to be the leading operating system for tablets worldwide, Android continues to be the leading operating system for mobile phones worldwide.
Regardless of the statistics, if you are an active forensic examiner, chances are very high you will need to conduct an examination of an iOS mobile device (if you haven’t several times already). This article will discuss some of the steps involved and areas of interest when conducting an analysis of an iOS device for Internet related activity.
Handset Passcodes
Depending on the version of iOS, different passcode lengths and complexities are supported.
- A simple four digit passcode
- A complex numeric passcode
- A complex alphanumeric passcode or passphrase
In many cases, you will need the passcode in order to obtain a physical image or a file system dump. Depending on the iOS version, device hardware version and passcode complexity, the passcode can sometimes be obtained by the forensic tool (such as Cellebrite) using a bruteforce attack.
Physical memory dump vs. file dump vs AFC file backup
Depending on the type of investigation, the tools you have available and the version of the iOS phone you need to examine, you may have a choice whether to conduct a physical memory extraction, a file system dump or an Apple File Connection (AFC) backup.
When possible, it would be recommended to obtain a full physical memory extraction since that will likely contain data that the file system dump & AFC backup does not (deleted file system data, etc.).
Physical memory image
This would typically be accomplished using a tool such as Cellebrite, XRY, Lantern, Elcomsoft, MPE or the Zdziarski method1. The result of using one of these tools would either be a bit stream (dd) or a DMG image file that could then be analyzed manually or using a forensic analysis tool.
File system dump
A file system dump, which is a subset of a physical image, could be performed by several well-known tools such as Cellebrite, Blacklight, Oxygen or XRY.
AFC backup
Apple file connection (AFC) is used with iTunes to conduct a device backup and can be used to perform a backup of data from the device. For example, EnCase v7 can acquire an iOS device using this technology (requires iTunes to be installed, but not running). An examiner can also look for backups on a computer the device has previously been connected to as another step to analyze data from the device without having access to the device itself.
Windows XP:
c:Documents and Settings\Application DataApple ComputerMobileSyncBackup
Windows Vista/7/8:
c:users\AppDataRoamingApple ComputerMobileSyncBackup
OSX:
~/Library/Application Support/MobilSync/Backup
Depending on the version of iOS & iTunes, the backup can be protected with a password, which is used to encrypt the backed up data. This password is independent from the device passcode.
File System Encryption
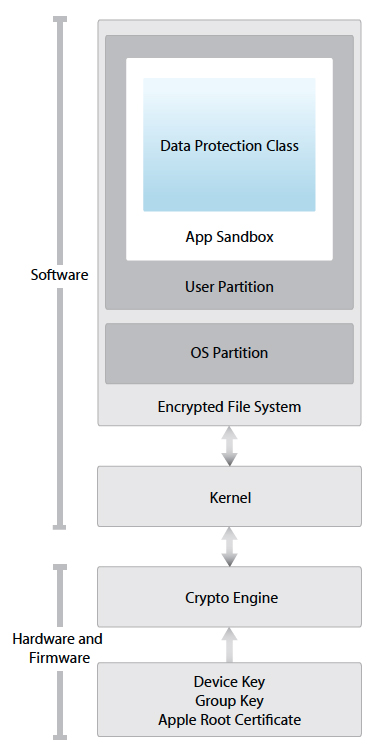
Figure 1: http://images.apple.com/iphone/business/docs/iOS_Security_Oct12.pdf
Starting with iOS 4 Apple began providing data protection for user data by encrypting the user partition. With the introduction of the iPhone 3GS (and continuing to the current iPhone 5 hardware device), Apple began including a hardware key that is used as part of the encryption process. This means that the physical device is needed in order to get all the components (keys) to successfully decrypt files that are protected with this level of encryption. iOS 5 introduced an additional layer of protection by encrypting files with individual keys.
Apple has defined four levels (classes) of protection for user data:
NSFileProtectionNone
The file has no special protections associated with it. It can be read from or written to at any time.
Available in iOS 4.0 and later.
Declared in NSFileManager.h.
NSFileProtectionComplete
The file is stored in an encrypted format on disk and cannot be read from or written to while the device is locked or booting.
Available in iOS 4.0 and later.
Declared in NSFileManager.h.
NSFileProtectionCompleteUnlessOpen
The file is stored in an encrypted format on disk and must be opened while the device is unlocked. Once open, your file may continue to access the file normally, even if the user locks the device.
Available in iOS 5.0 and later.
Declared in NSFileManager.h.
NSFileProtectionCompleteUntilFirstUserAuthentication
The file is stored in an encrypted format on disk and cannot be accessed until after the device has booted. After the user unlocks the device for the first time, your app can access the file and continue to access it even if the user subsequently locks the device.
Available in iOS 5.0 and later.
Declared in NSFileManager.h.
The default class for all files that are not otherwise assigned to a different data protection class is NSFileProtectionNone. This level uses individual keys for each file, but the keys are protected with a single system key so all the user data can be easily ‘erased’ during a reset (not really erased, it just deletes the system key and therefore the individual keys and data can never be recovered), but the key is easily viewed forensically since the system key can easily be obtained, without the need of the hardware key on the device itself. This level is not really meant to protect data, but rather provide a quick way to render data unreadable/unrecoverable. Each installed user application can dictate what class level to store the data generated by that application, but many use the default.
The other levels of data protection incorporate the use of the hardware key that is unique for each particular device. This means that while you may be able to collect a physical image of an iPhone 4 or 5 and read the image file system, you cannot view unencrypted versions of the files themselves. If you have the device passcode and can obtain a file dump, you can however analyze the logical files, but will not be able to search unallocated.
iOS Decryption with IEF 6.1.1
Internet Evidence Finder 6.1.1 introduced the ability to search an iOS image and files that may be protected with data encryption by providing the keys that are obtained by Cellebrite during the physical extraction process. IEF now looks for the associated .UFD file that the UFED creates during a physical extraction. The necessary keys are recorded in the .UFD file and IEF can now use those keys to decrypt data that is protected by only the system key.
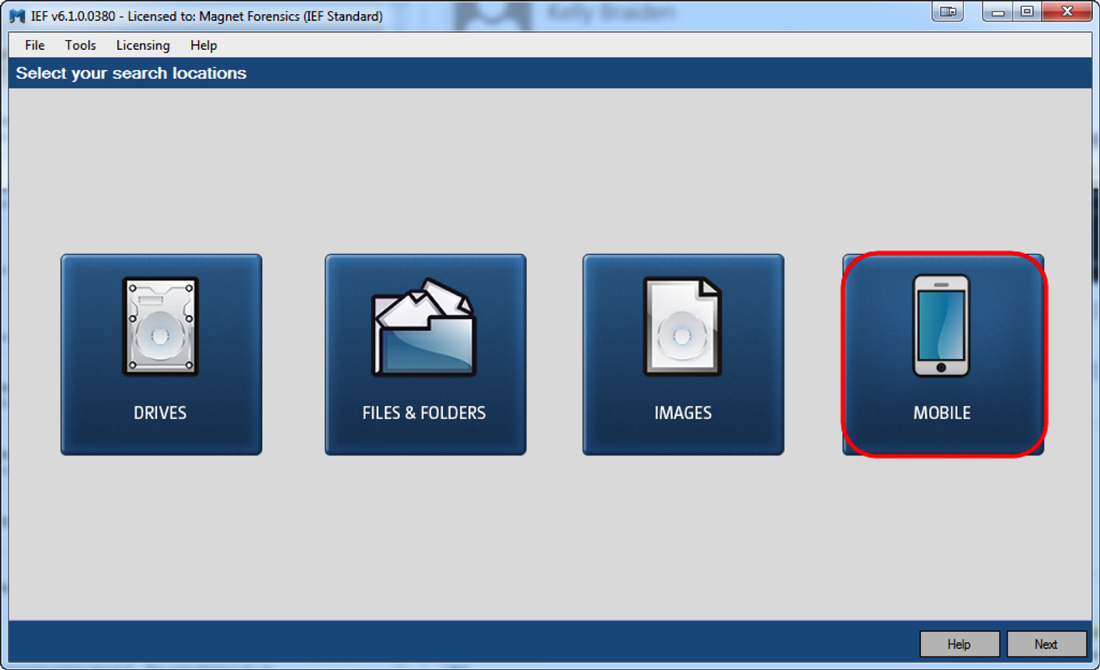
Loading an iOS image into Internet Evidence Finder
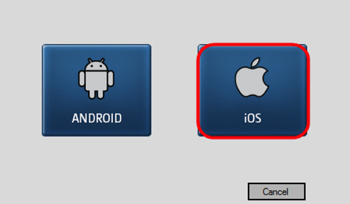
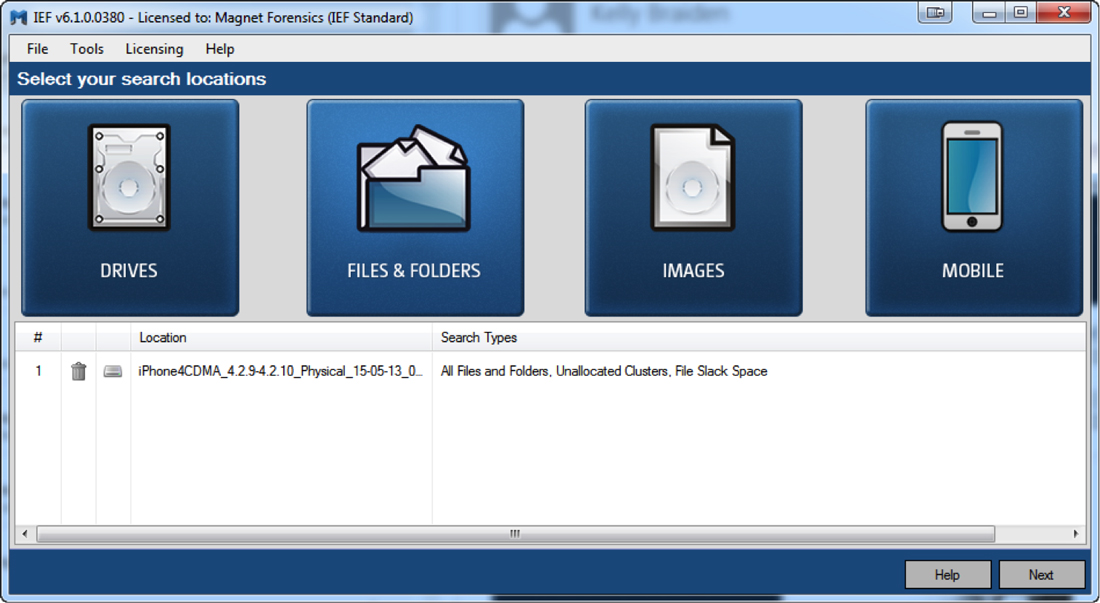
Mobile phone support was added in IEF v6.1 and loading an image of an iOS device is very similar to loading an image of a hard drive. From the main splash screen, simple choose the “Mobile” option, iOS, then “Images”. You can point IEF directly to a bin, dmg or dd file.
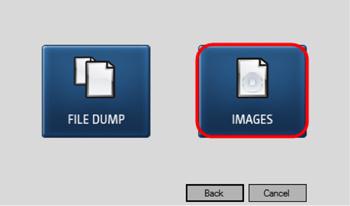
Loading a file dump into Internet Evidence Finder
If you have obtained a logical file dump, you can follow the same steps as above, but instead choose the “File Dump” option and select the root folder that contains all the files you want to analyze. From this point you can continue to add more smartphone images, hard drive images or files you want to search before proceeding to the artifact selection page.

Once completed, IEF will display all the found artifacts placed in their respective categories:

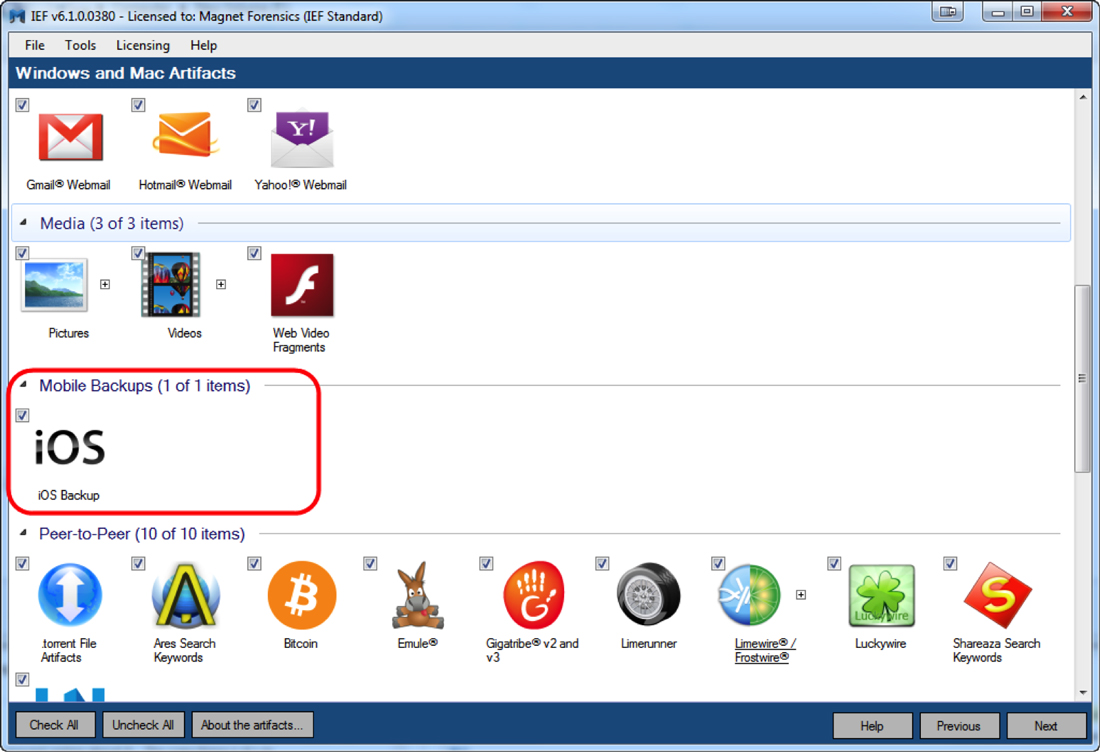
Loading iOS backup files into Internet Evidence Finder
iOS backup files are normally found on a computer hard drive. Therefore, to include iOS backup files in the artifact search, select the computer hard drive from the main “Images” option, then be sure and select the “iOS backups” option from the artifact selection screen:
Summary
Depending on how you have acquired data from the iOS device, you have three distinct options to analyze it with IEF.
Physical Image (bin file from Cellebrite, DMG from Lantern or other ‘dd’ type image)
Use IEF Advanced and choose the ‘iOS’->’Images’ option. If you used a Cellebrite UFED to extract the physical image and have the associated .UFD file, make sure it is in the same directory as the cellebrite physical image file (.bin) and IEF will automatically look for the .UFD file and use any keys that are present to decrypt user data.
File Dump
Use IEF Advanced and choose the ‘iOS’->’File Dump’ option, point IEF to the root of the file dump folder.
iOS Backup Files
Use IEF Standard or IEF Advanced and choose the ‘iOS Backup’ from the Mobile Backups artifact category.
As always, I appreciate the feedback, comments or questions. You can reach me anytime at lance(at) magnetforensics(dot)com. Special thanks to Ryan Kubasiak from Blackbag Technologies for some of the detailed iOS encryption information and document references.
___________
1Jail breaking could be another option, but is outside of the scope of this article and will not be discussed.